Eternia - Wedding WordPress Theme
Created: 02 February 2026
Latest Update: 06 March 2026
Version: 1.0
Recommended WordPress Version : 6.9
By: risingthemes
Email : support@risingthemes.net
Thank you very much for purchasing our theme.
We hope you have enjoyed the template’s live preview and you want to create such a beautiful website. Now, this documentation is everything needed for you to setup your perfect website. Please follow each instruction carefully, even single a line of code can do wonders (in all senses) so please don’t miss anything on this user guide
If you have any question, please feel free to contact us.
Read this before you edit anything
1. Why this documentation is very important?
We are sure that we have covered all the essential instructions needed to setup a nice theme as you see in our template’s live preview. We expect you to read this user guide before you open any support request (if you ask about things already present in this guide, you will be gently asked to read this again)
2. If I need help, will you provide free support?
Yes, we have a dedicated support system where we offer free support. Our support is applicable only for issues and bugs within our product. We do NOT provide free customisation services in the scope of free support.
3. What kind of support are you providing?
We offer free support for our products where we can help you fix issues within our code (if any) and assist you on theme setup. Please note support is not applicable for third party jQuery plugins and GPL code components (because they are not created or maintained by us).
4. When can I expect a response from you?
Our team will be online during 10.00 to 17.00 on Monday – Friday (IST, India). For support request we usually make a response within 24 hours. Due to the complex nature of some queries, responses can’t be guaranteed a specific turn-around time, but we value each user and we will surely get back to you. In case if we experience heavy load of support tickets we will announce the status on Twitter.
5. If I need to customize this template will you offer it?
We are unable to provide free customisation services on our products. If you have great passion and considerable budget please open the request as a premium project, please email to: support@risingthemes.net We will get back to you via email.
6. How can I know about future updates and bug fixes?
We release updates regularly and we notify our users via Tweets as well as Email Newsletters (we do hate spam).
Theme Installation
1. Through WordPress Dashboard
- Go to the menu Appearance > Themes and click on Add New button.
- Click on Upload Theme button.
- Click on Browse button and navigate to the unzipped theme package on your computer.
- Look for a file called eternia-pro.zip Click on it to select, then click OK.
- Click on Install Now button and wait until the installation is complete.
- Click on Activate link to activate the theme on your WordPress site.
- Go to Appearance >> Theme Options >> Restore Default.
Manual Installation using FTP client
If you know the FTP login details of the server where your site is hosted and you have a FTP client installed (such as FileZilla), you might consider using this way of uploading your theme.
- Unzip the eternia-pro.zip file
- Upload theme to /wp-content/themes/
- Go to Appearance -> Themes and activate theme from Dashboard.
First you have to unzip the download file, find the zip file called eternia-pro.zip, unzip it and upload the folder to the main WordPress installation folder » wp-content » themes. Please note that if you prefer this way of installation, you have to make sure that the main files of the theme are contained just within one folder of the themes folder.
You can activate the theme after it is uploaded on the server. In order to activate this theme you have to go to the admin panel » Appearance » Themes. In this section you should see the theme with a title cruiser. Just click on the Activate button and your theme should get activated.
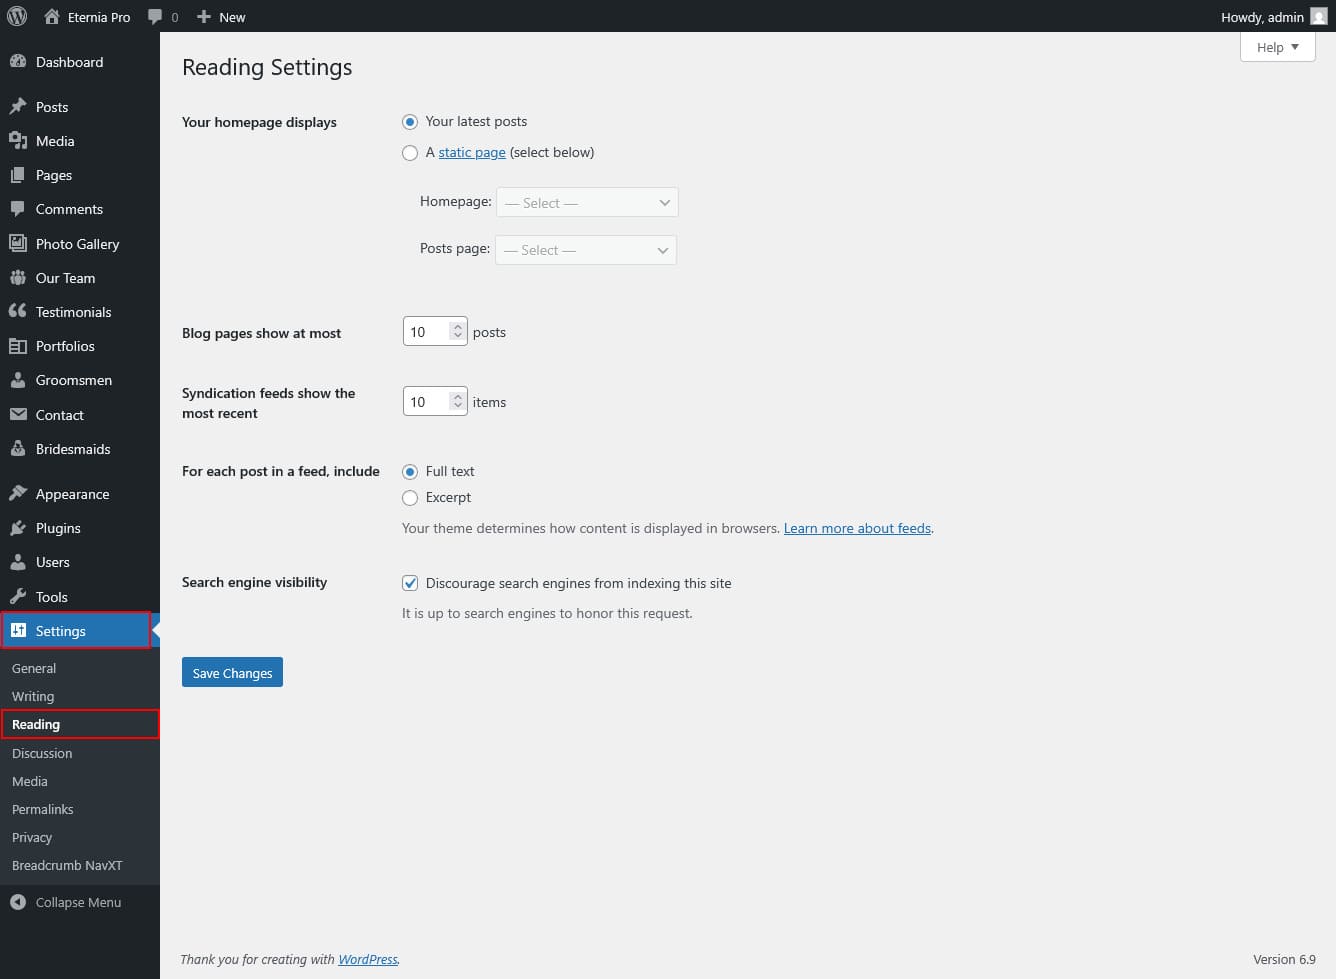
Homepage Setup
After activating the eternia theme, setup homepage using following
- Go to Settings -> Reading -> Front page displays
- Click on radio button of Your latest posts
- Go to Appearance -> Theme Options and click on Restore Defaults in bottom side
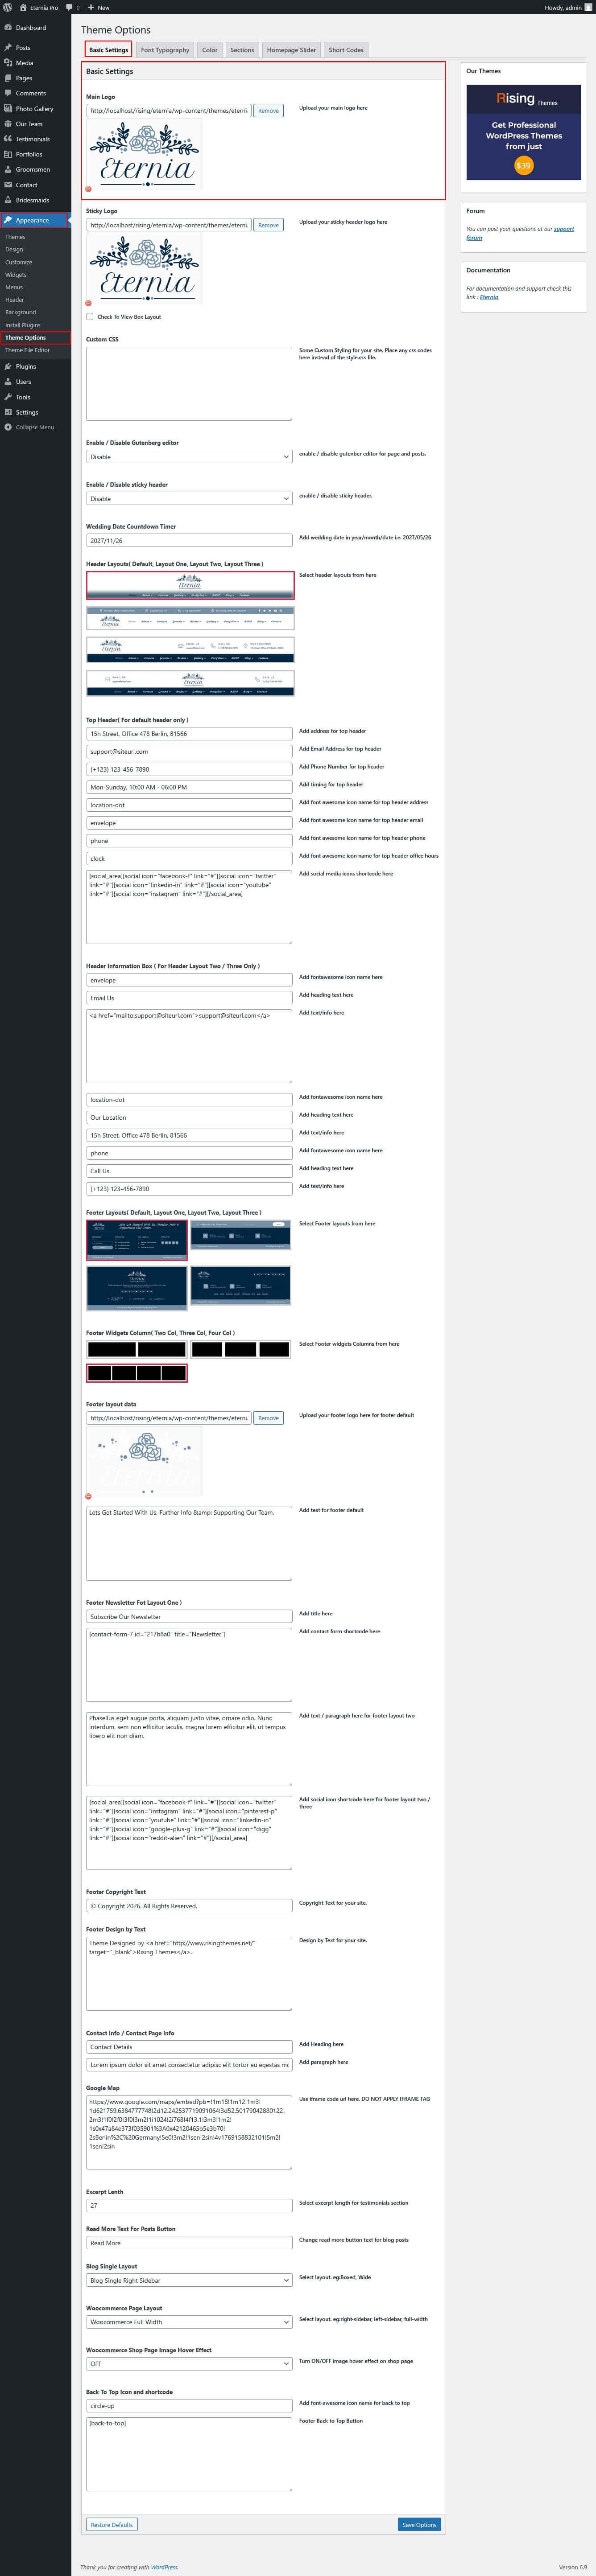
Header Setting
The header consists of four main elements:
- Site Name / Logo
- Navigation Menu

1. Setting the Site Logo
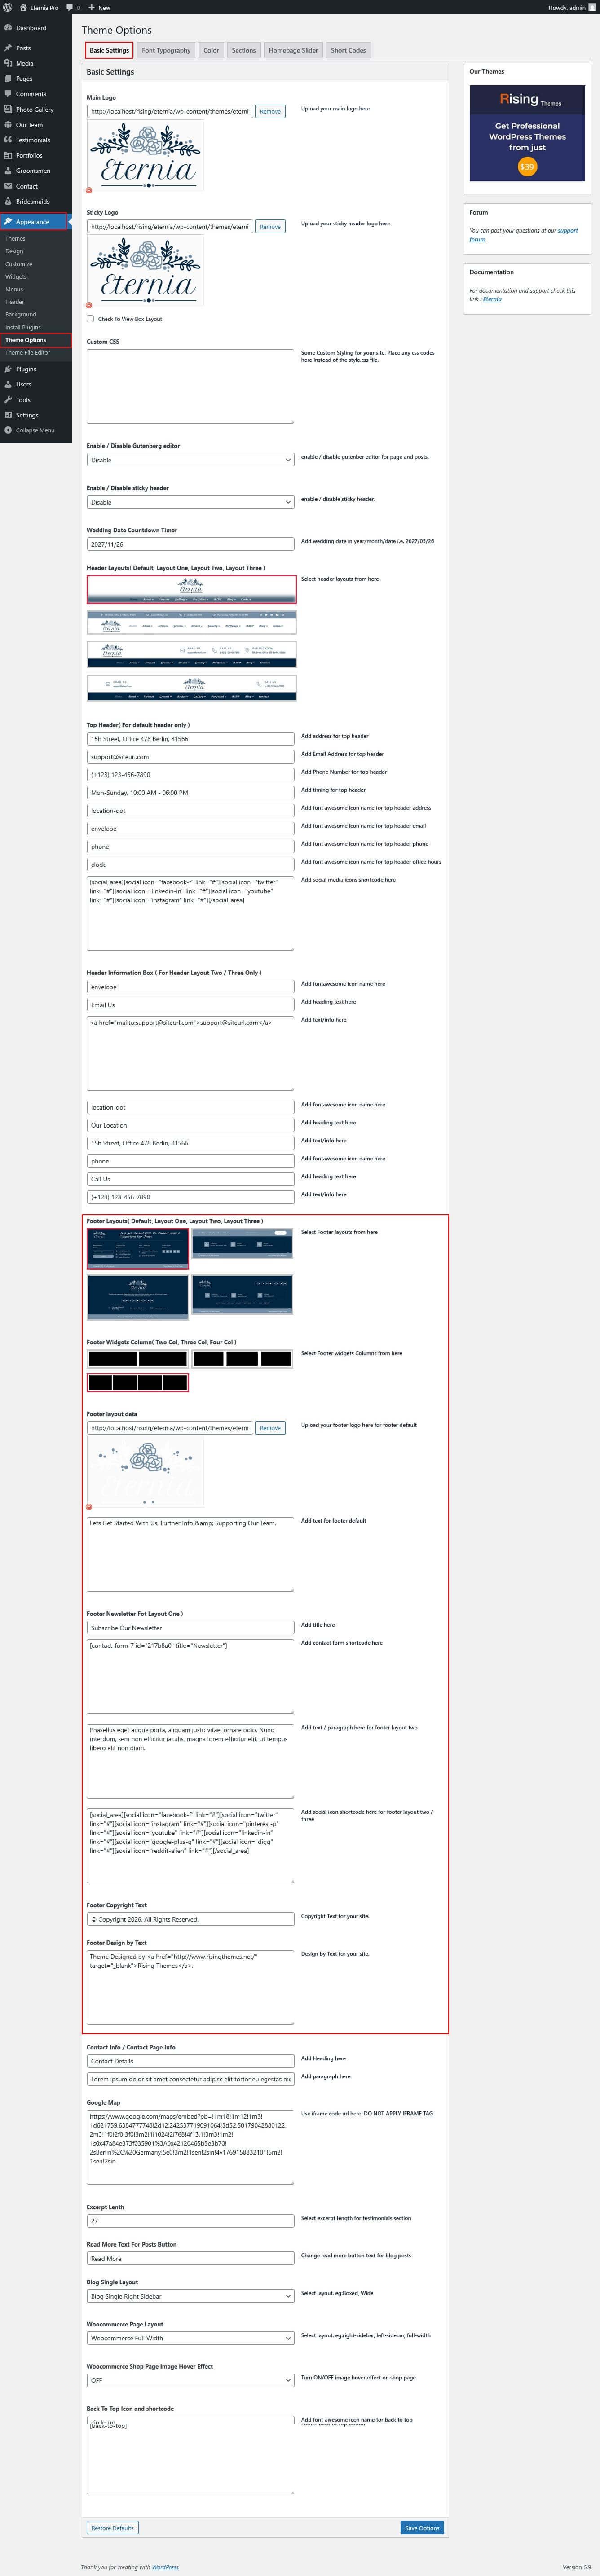
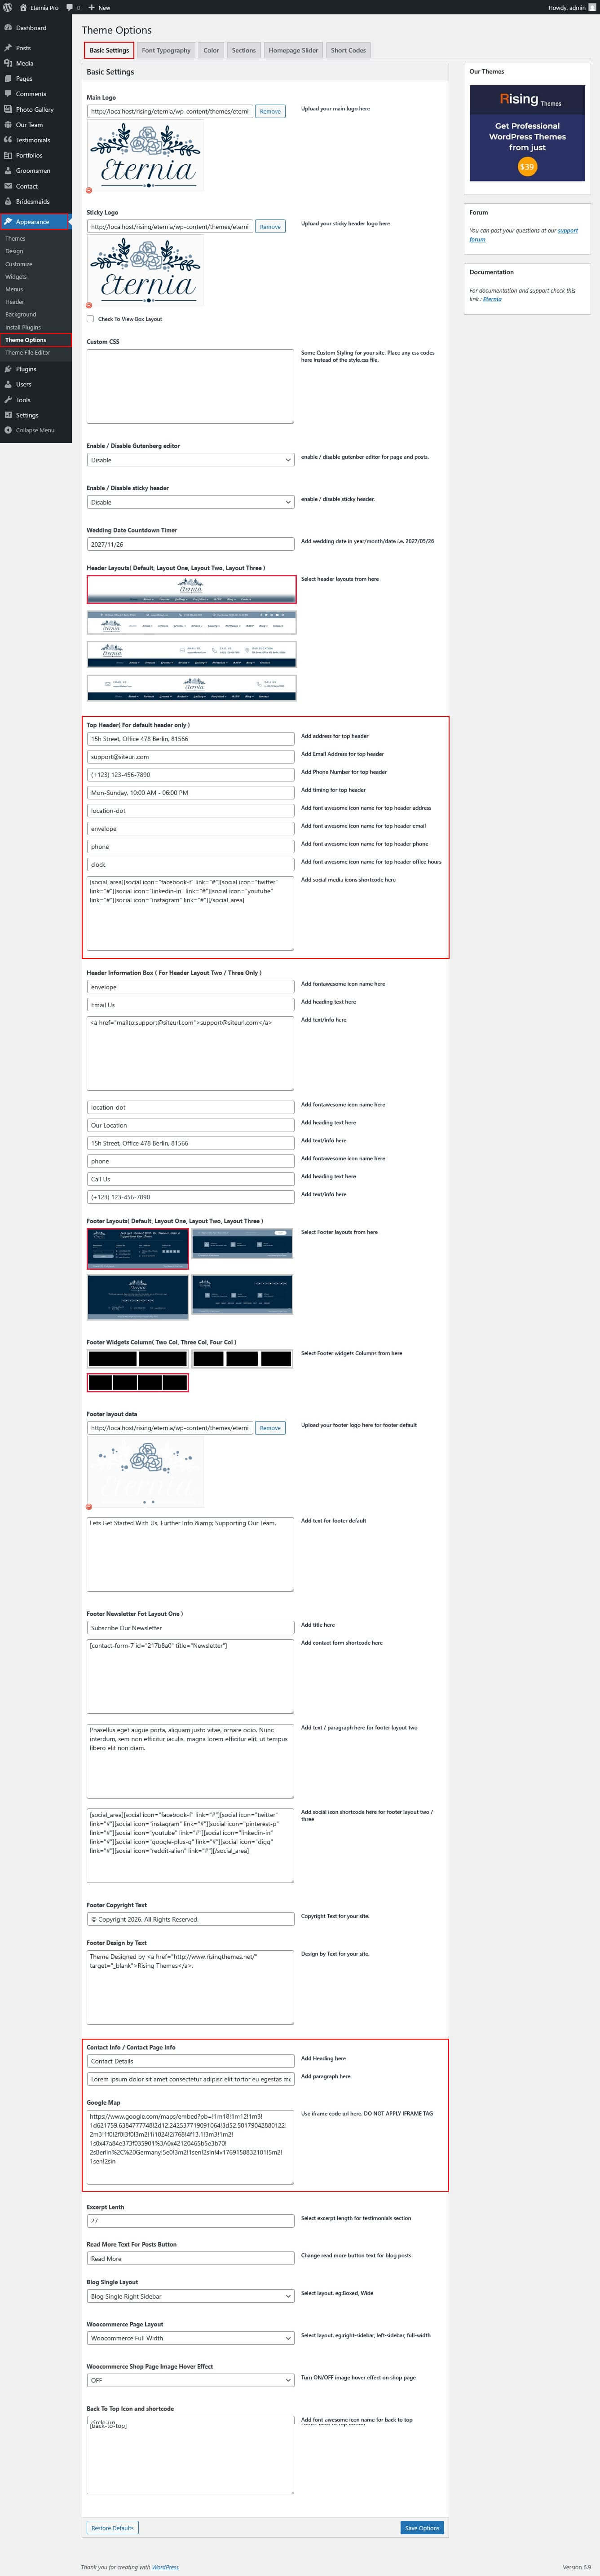
The settings for to change the Site Logo is located in Appearance » Theme Options » Basic Setting
Setup Navigation
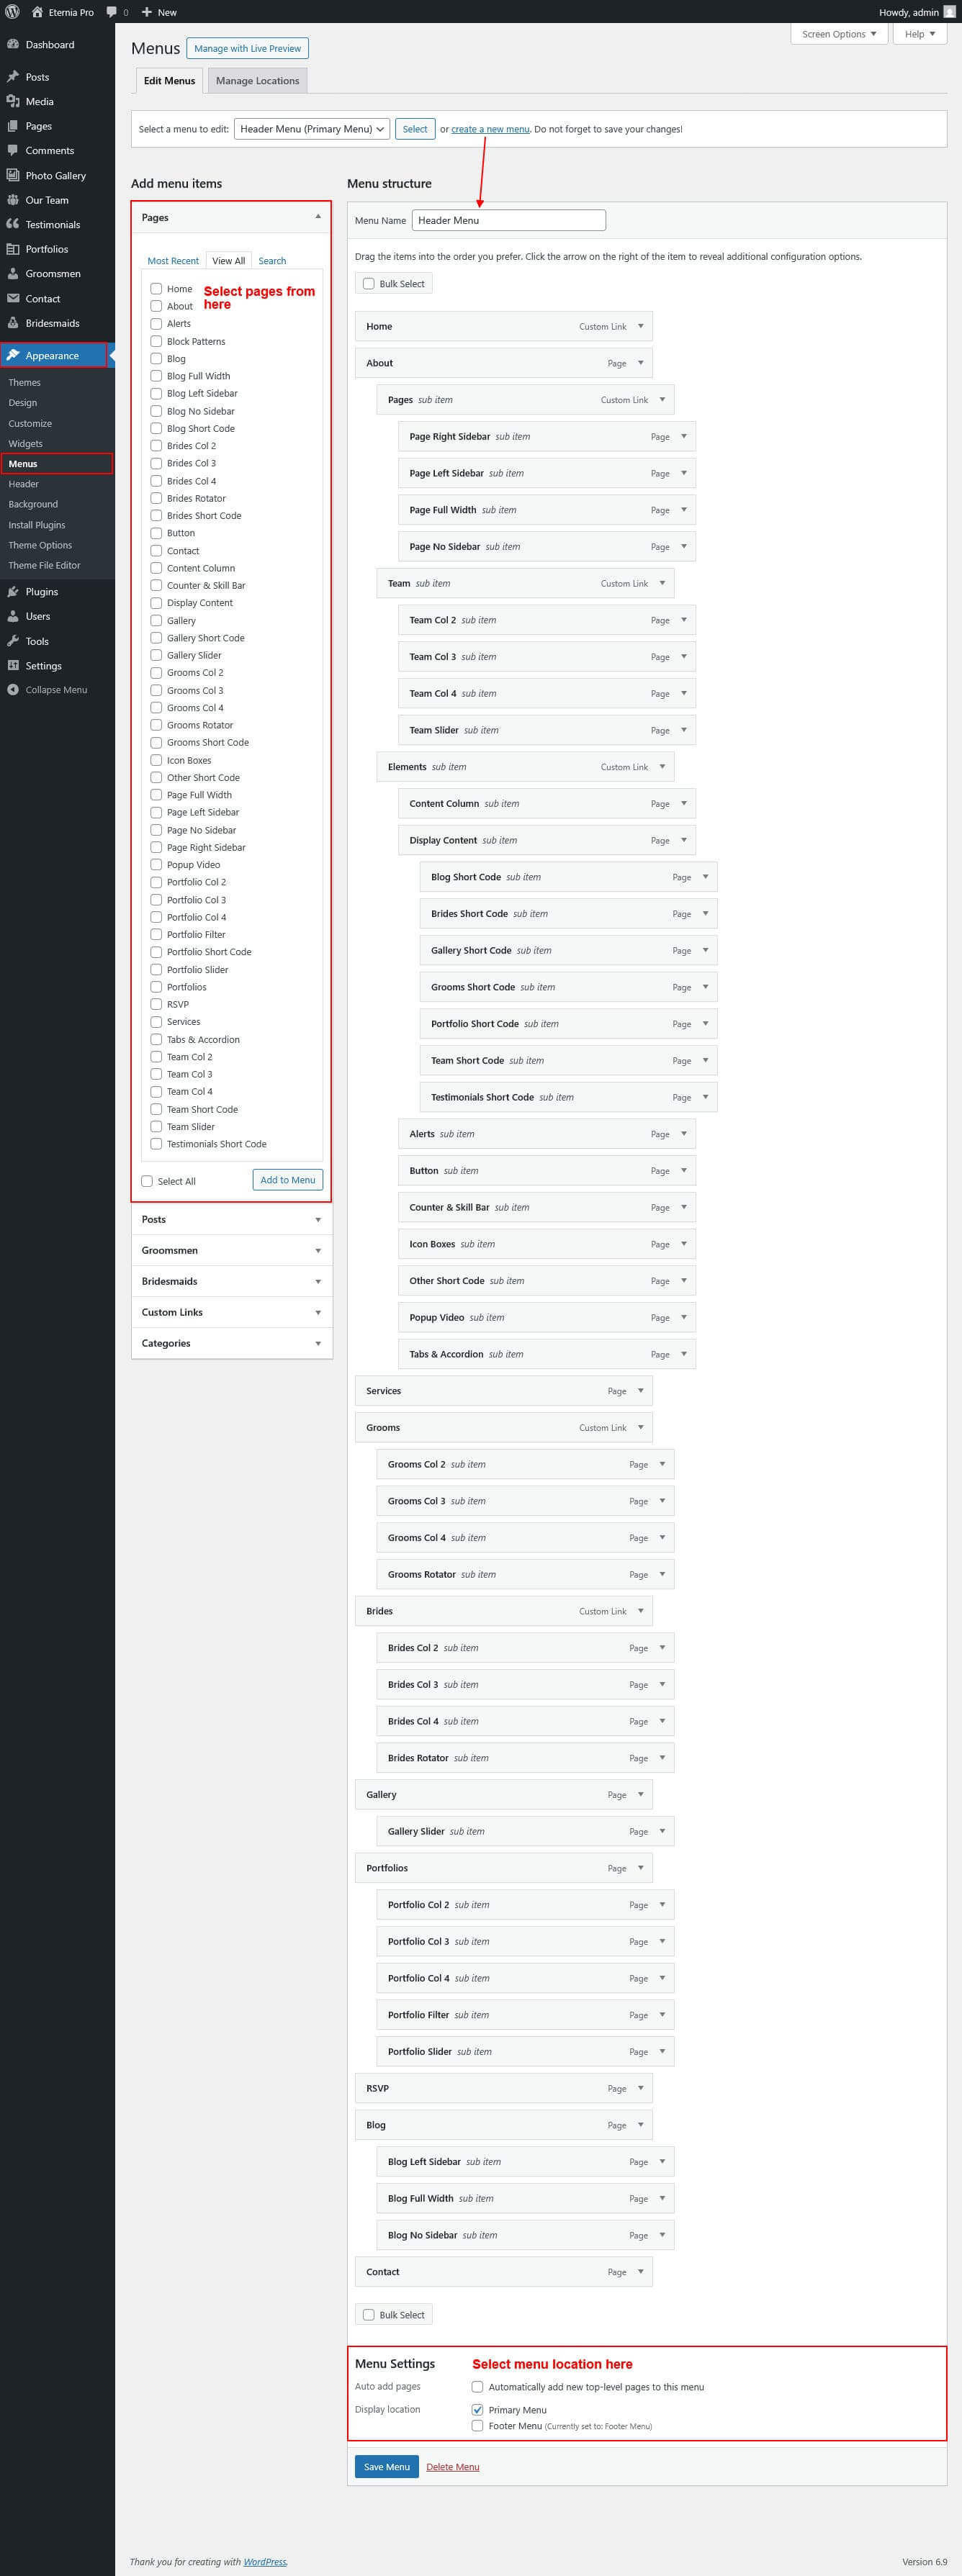
1. Multipage Menu
- First of all create pages from Pages >> Add new page
- Go to Appearance >> Menu
- Click on Create a new menu link
- Give a name to your menu in Menu name and click save menu button
- Once you have create menu. You need to add pages by selecting with checkboxes. After adding menu list you can arrange it by drag and drop.
- Click Save Menu after adding required pages, categories in the menu
Primary Menu
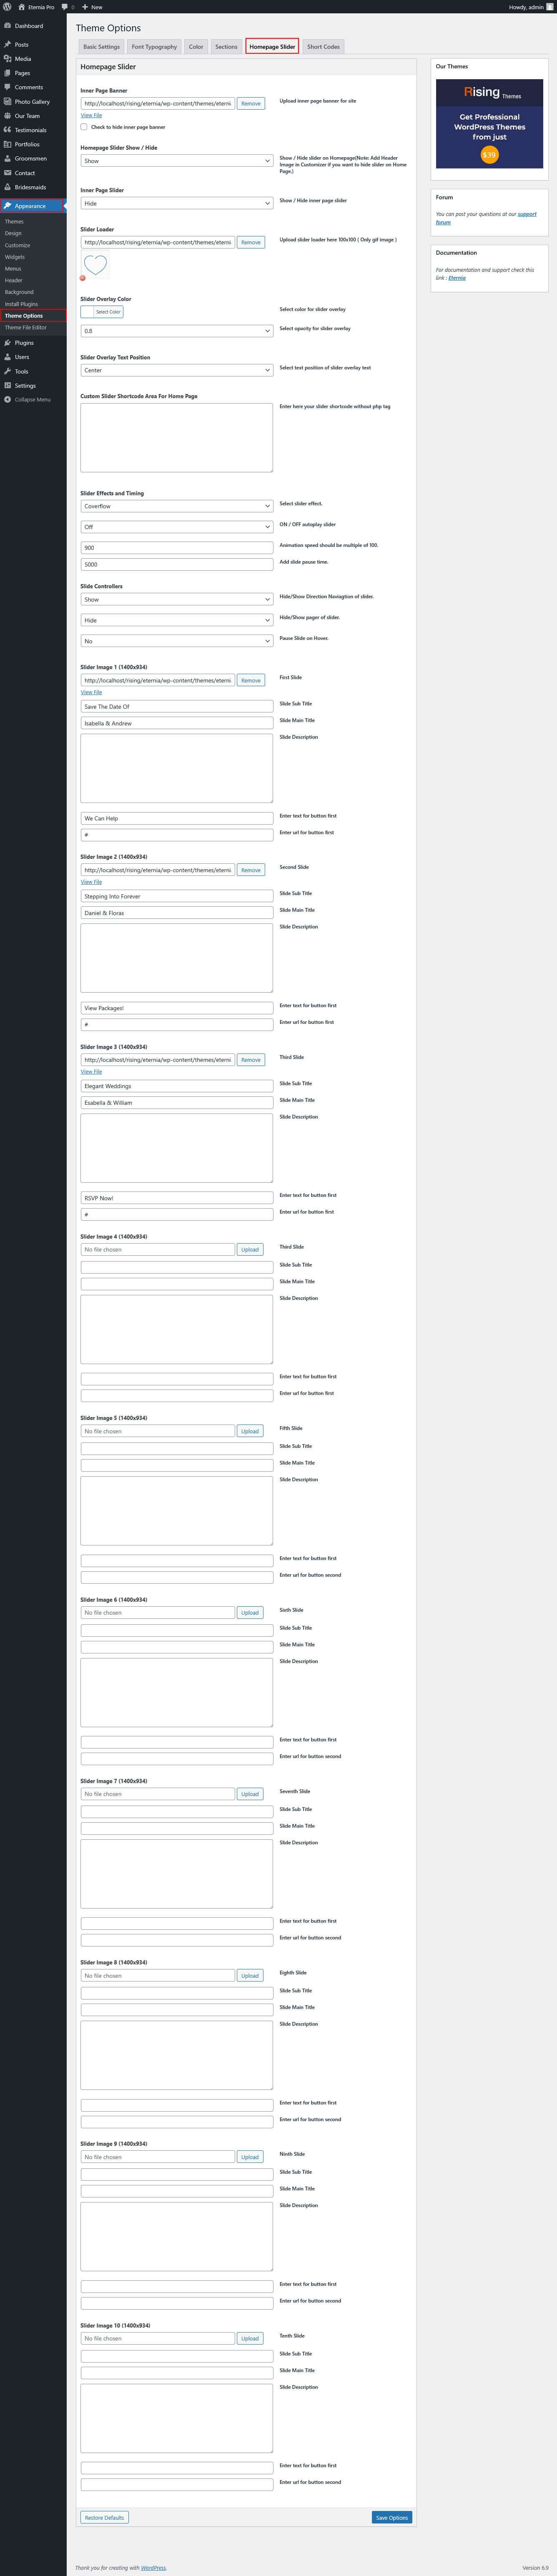
Setup Homepage Slider
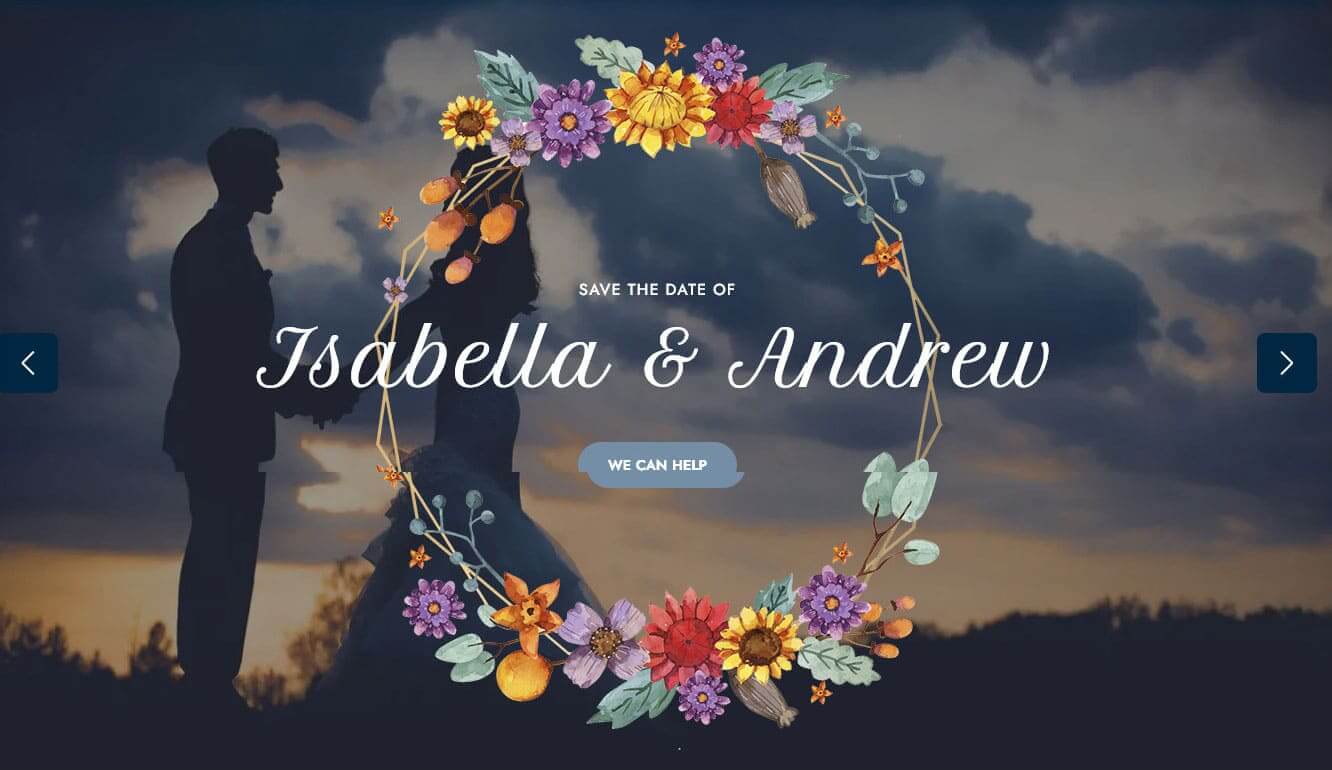
In order to add slides to homepage slider go to the Appearance » Theme Options » Homepage Slider
For each slide there are different options that you can apply.
- You can change Home Page Slider Hide/Show.
- You can change Slider Effects and Timing.
- You can change Slider Animation speed, pause time
- You can change Slider Hide/Show Direction Naviagtion of slider.
- You can change Slider Hide/Show pager of slider.
- You can change Slider Pause Slide on Hover.
- Slider images should be of size 1400 × 750 pixels
If you don't want to use this default image slider, you can use any image slider WordPress plugin
- Go to Appearance » Theme Options » Homepage Slider
- Enter your slider shortcode which is provided by plugin without php tag
Sections
Section setting
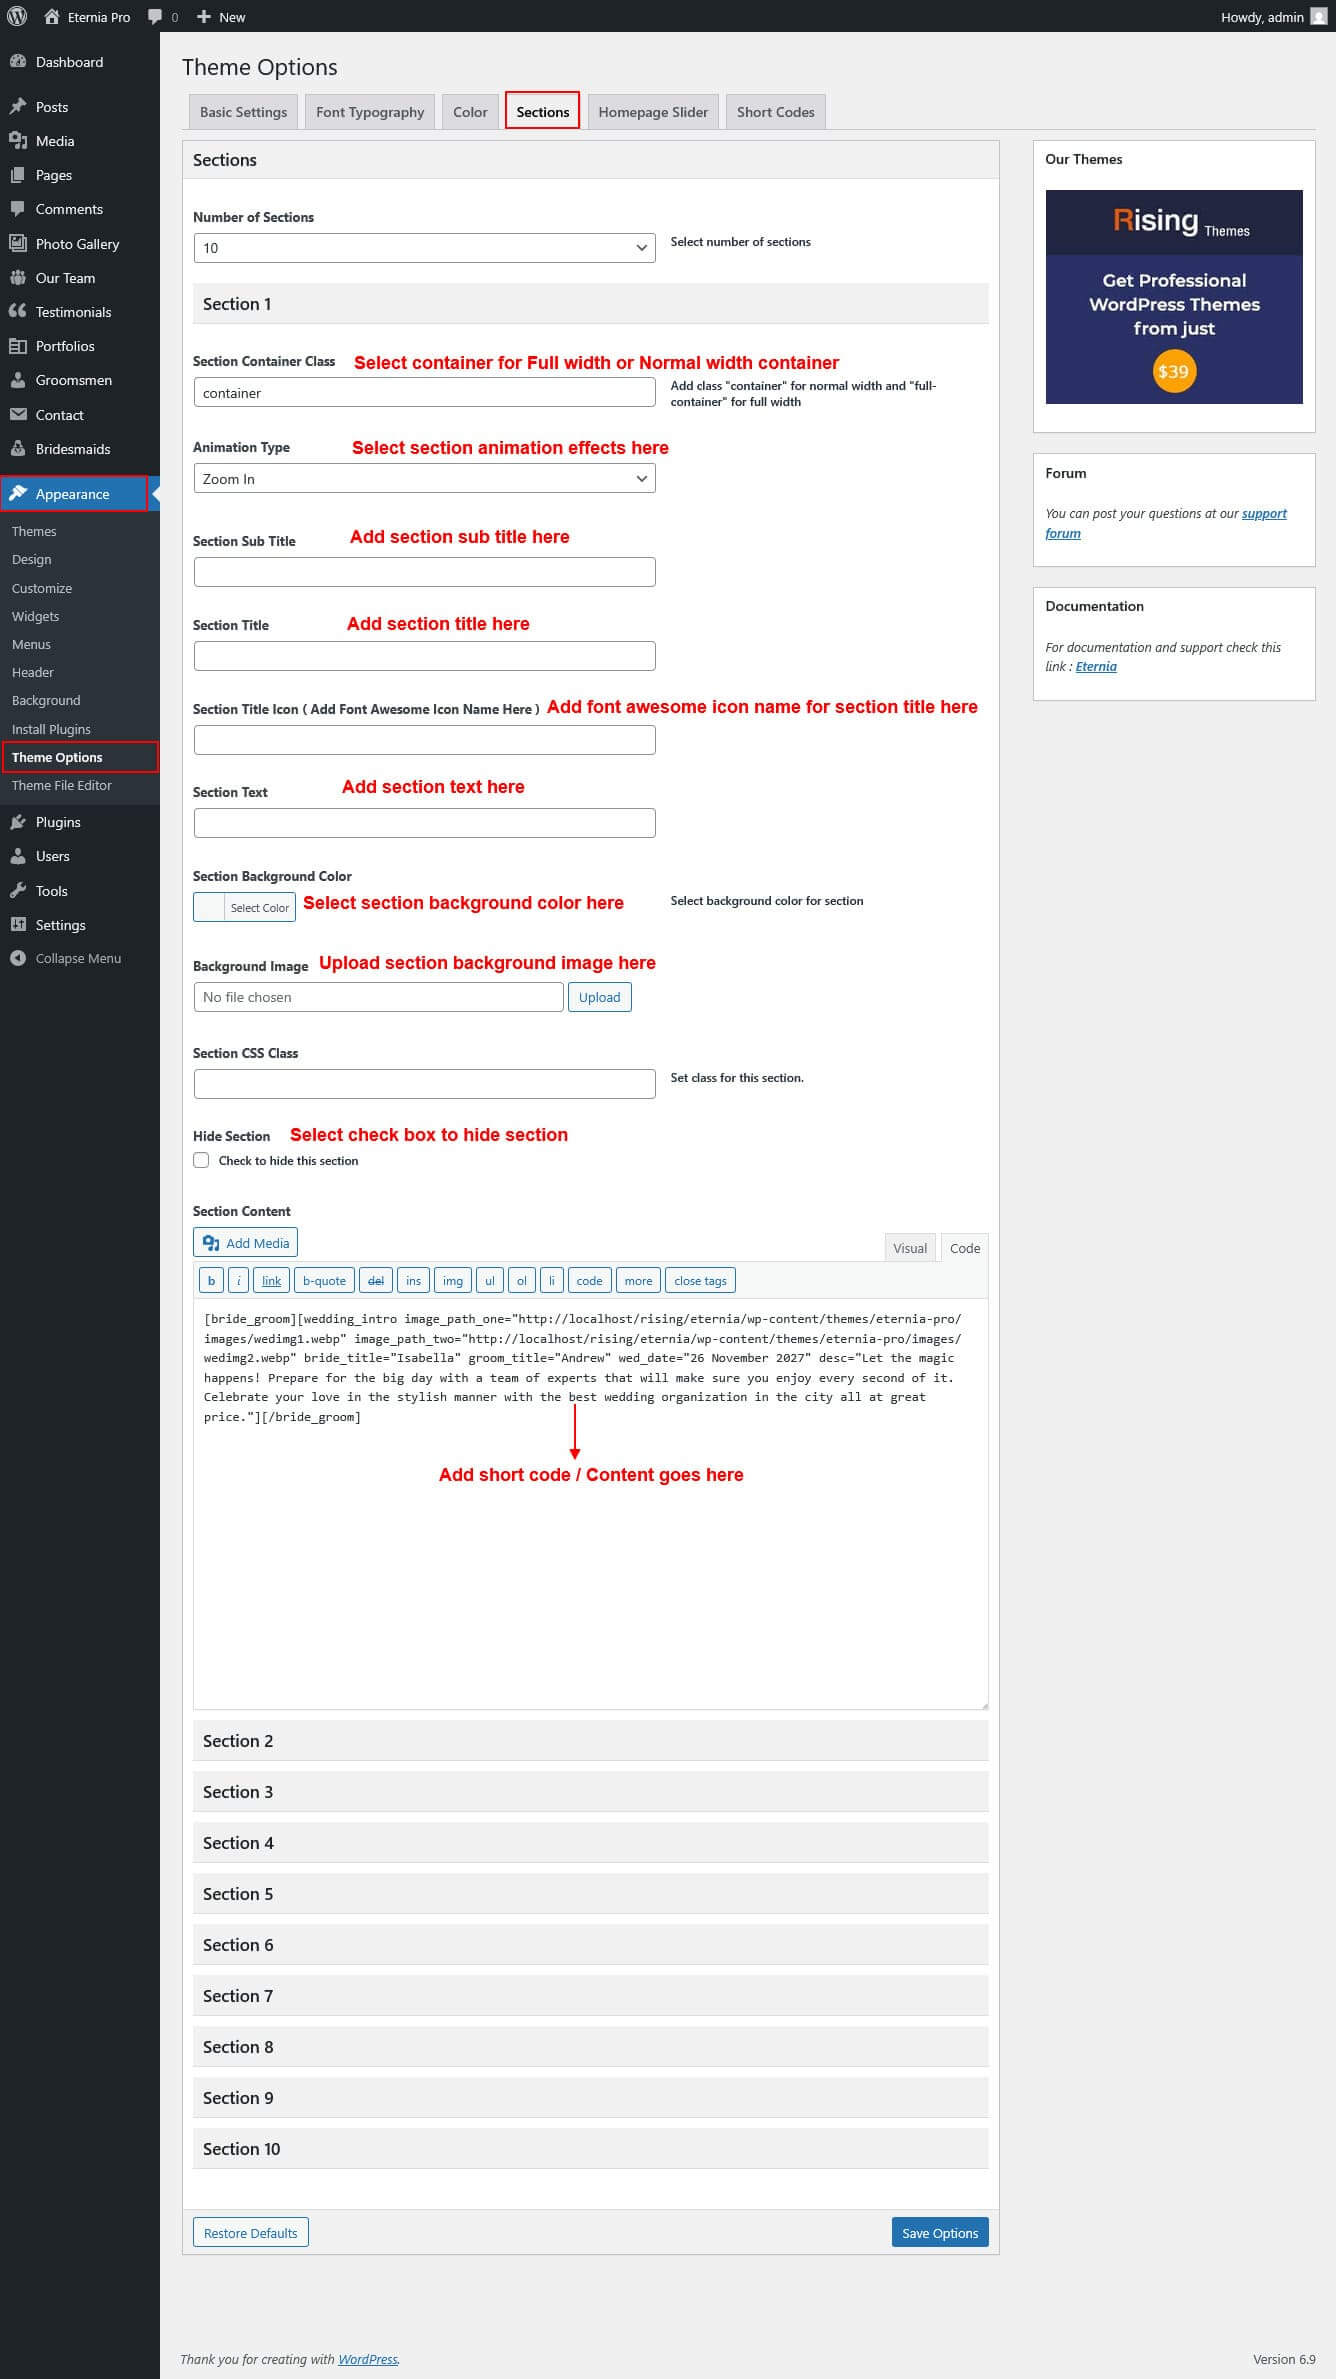
Homepage Sections
The homepage contatins lots of section to create beautiful and professional website.
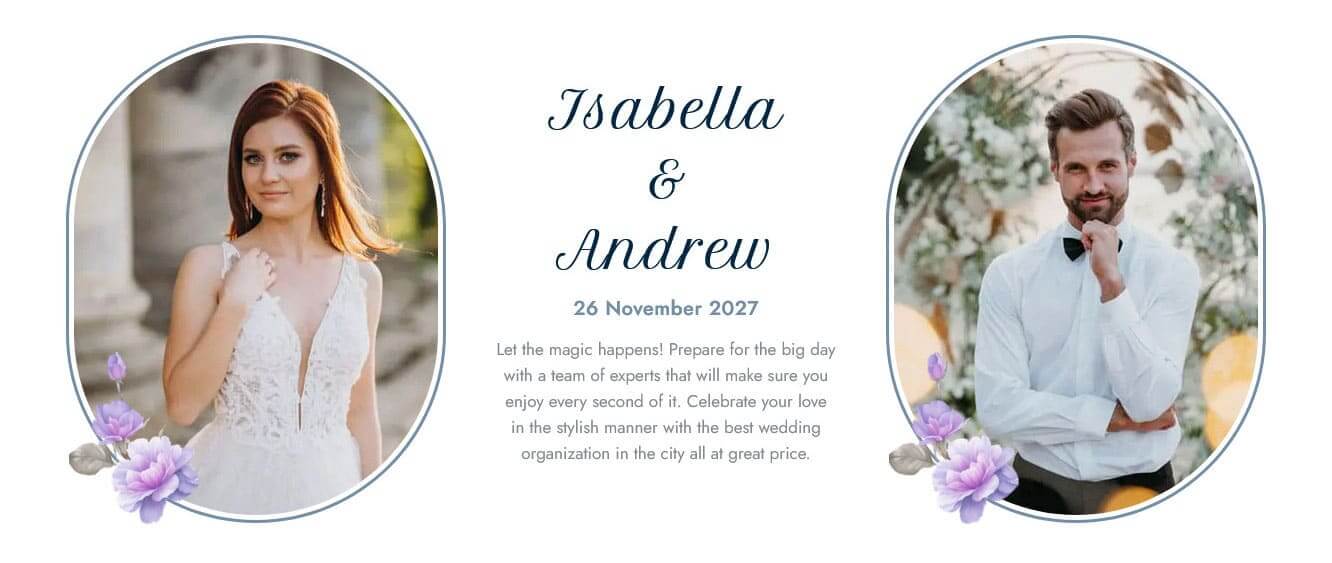
1. Bride And Groom Introduction Section
- To manage this section go to Appearance » Theme Options » Sections » Section 1
- Use this shortcode to display Bride And Groom Introduction section :
- [bride_groom][wedding_intro image_path_one="Add image path one here" image_path_two="Add image path two here" bride_title="Add bride name here" groom_title="Add groom name here" wed_date="Add wedding date here ex. (26 November 2027)" desc="Add small description here"][/bride_groom]
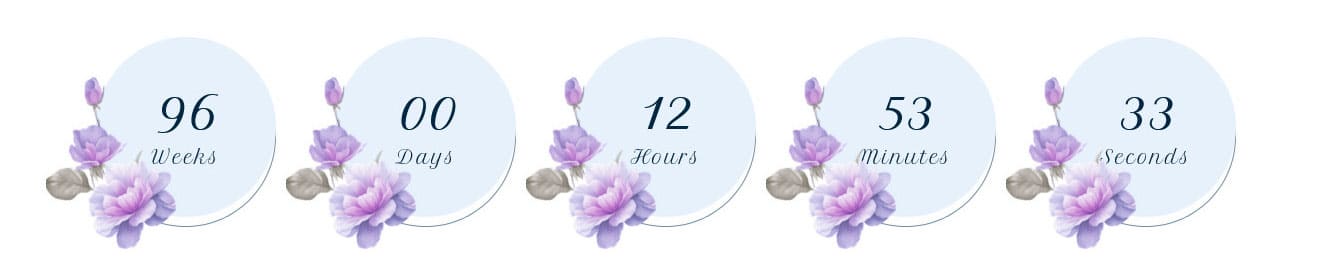
2. Wedding Countdown Section
- To manage this section go to Appearance » Theme Options » Sections » Section 2
- Use this shortcode to display Wedding Countdown section :
- [wedding-countdown]
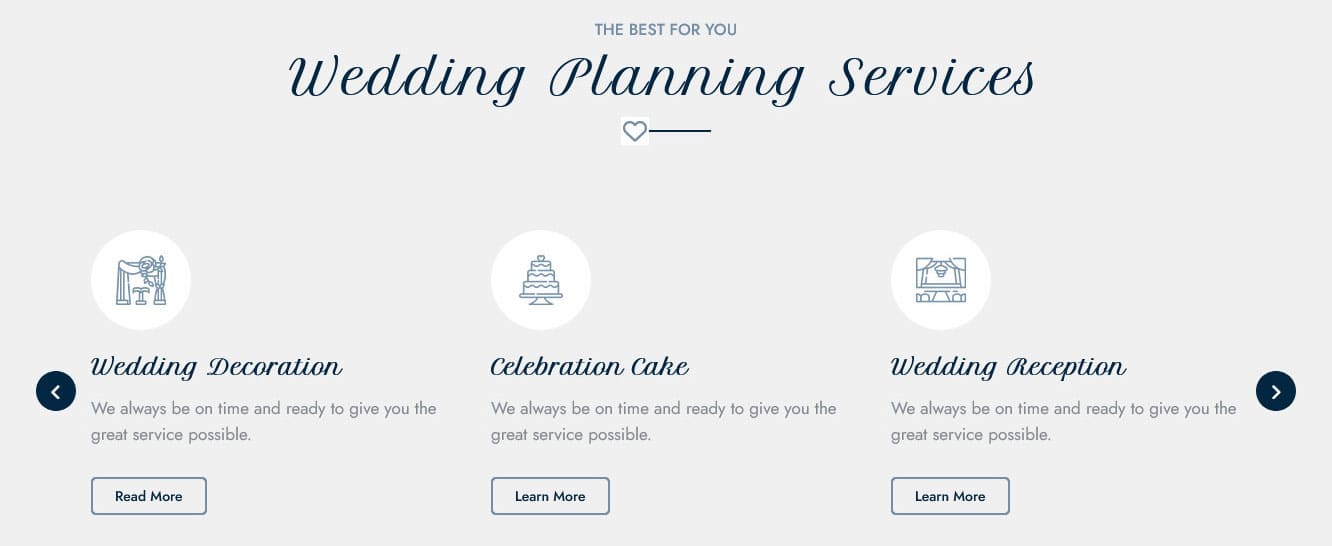
3. Wedding Planning Services Section
- To manage this section go to Appearance » Theme Options » Sections » Section 3
- Use this shortcode to display Wedding Planning Services section :
- Services Rotator :- [services_lists][service_box image_path_icon="Add image path icon here" service_ttl="Add title here" btn_link="Add link here" btn_text="Add button text here"] Add small content goes here... [/service_box][service_box image_path_icon="Add image path icon here" service_ttl="Add title here" btn_link="Add link here" btn_text="Add button text here"] Add small content goes here... [/service_box][service_box image_path_icon="Add image path icon here" service_ttl="Add title here" btn_link="Add link here" btn_text="Add button text here"] Add small content goes here... [/service_box][service_box image_path_icon="Add image path icon here" service_ttl="Add title here" btn_link="Add link here" btn_text="Add button text here"] Add small content goes here... [/service_box][service_box image_path_icon="Add image path icon here" service_ttl="Add title here" btn_link="Add link here" btn_text="Add button text here"] Add small content goes here... [/service_box][service_box image_path_icon="Add image path icon here" service_ttl="Add title here" btn_link="Add link here" btn_text="Add button text here"] Add small content goes here... [/service_box][/services_lists]
- Services Grid :- [services_lists layout="grid" columns="2/3/4"][service_box image_path_icon="Add image path icon here" service_ttl="Add title here" btn_link="Add link here" btn_text="Add button text here"] Add small content goes here... [/service_box][service_box image_path_icon="Add image path icon here" service_ttl="Add title here" btn_link="Add link here" btn_text="Add button text here"] Add small content goes here... [/service_box][service_box image_path_icon="Add image path icon here" service_ttl="Add title here" btn_link="Add link here" btn_text="Add button text here"] Add small content goes here... [/service_box][service_box image_path_icon="Add image path icon here" service_ttl="Add title here" btn_link="Add link here" btn_text="Add button text here"] Add small content goes here... [/service_box][service_box image_path_icon="Add image path icon here" service_ttl="Add title here" btn_link="Add link here" btn_text="Add button text here"] Add small content goes here... [/service_box][service_box image_path_icon="Add image path icon here" service_ttl="Add title here" btn_link="Add link here" btn_text="Add button text here"] Add small content goes here... [/service_box][/services_lists]
4. Story Timeline Section
- To manage this section go to Appearance » Theme Options » Sections » Section 4
- Use this shortcode to display Story Timeline section :
- [story_timeline][story_item image_path="Add image path here" image_position="Add image position here ex. (left/right)" title="Add title here" story_date="Add story date here ex. (15)" story_month="Add story month name here ex. (March)" story_time="Add story time here ex. (AT 02:00 PM)"] Add small content goes here... [/story_item][story_item image_path="Add image path here" image_position="Add image position here ex. (left/right)" title="Add title here" story_date="Add story date here ex. (15)" story_month="Add story month name here ex. (March)" story_time="Add story time here ex. (AT 02:00 PM)"] Add small content goes here... [/story_item][story_item image_path="Add image path here" image_position="Add image position here ex. (left/right)" title="Add title here" story_date="Add story date here ex. (15)" story_month="Add story month name here ex. (March)" story_time="Add story time here ex. (AT 02:00 PM)"] Add small content goes here... [/story_item][story_item image_path="Add image path here" image_position="Add image position here ex. (left/right)" title="Add title here" story_date="Add story date here ex. (15)" story_month="Add story month name here ex. (March)" story_time="Add story time here ex. (AT 02:00 PM)"] Add small content goes here... [/story_item][/story_timeline]

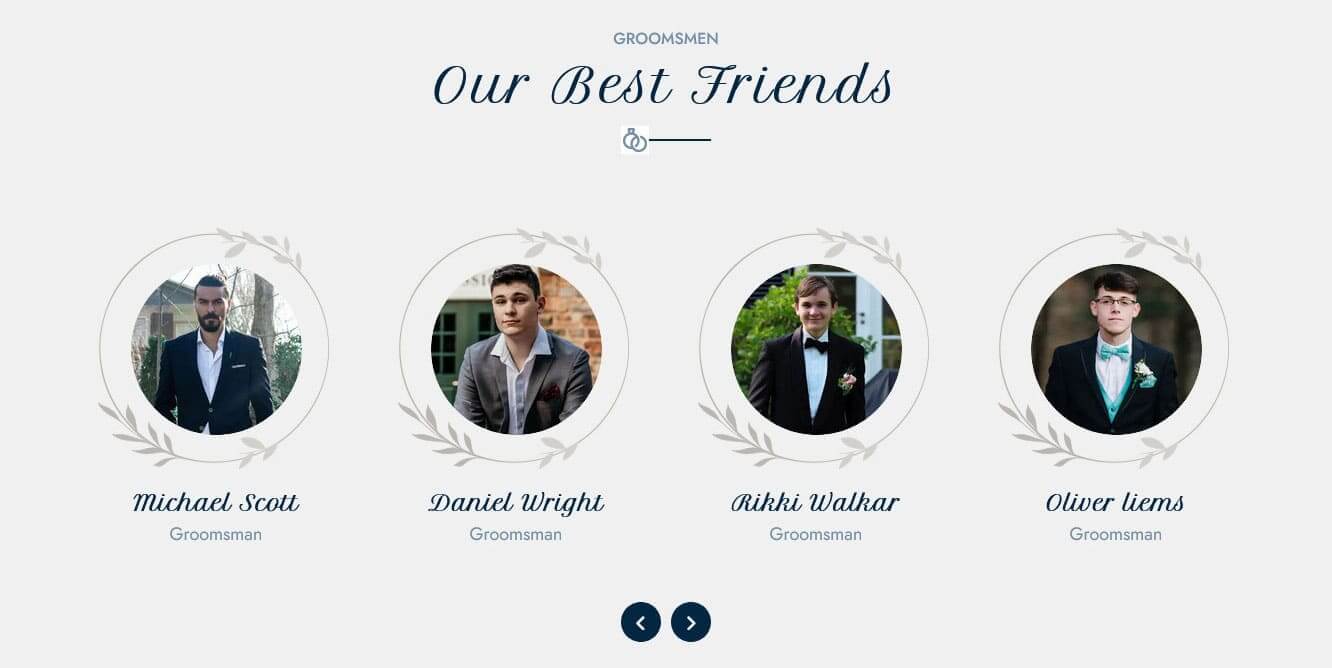
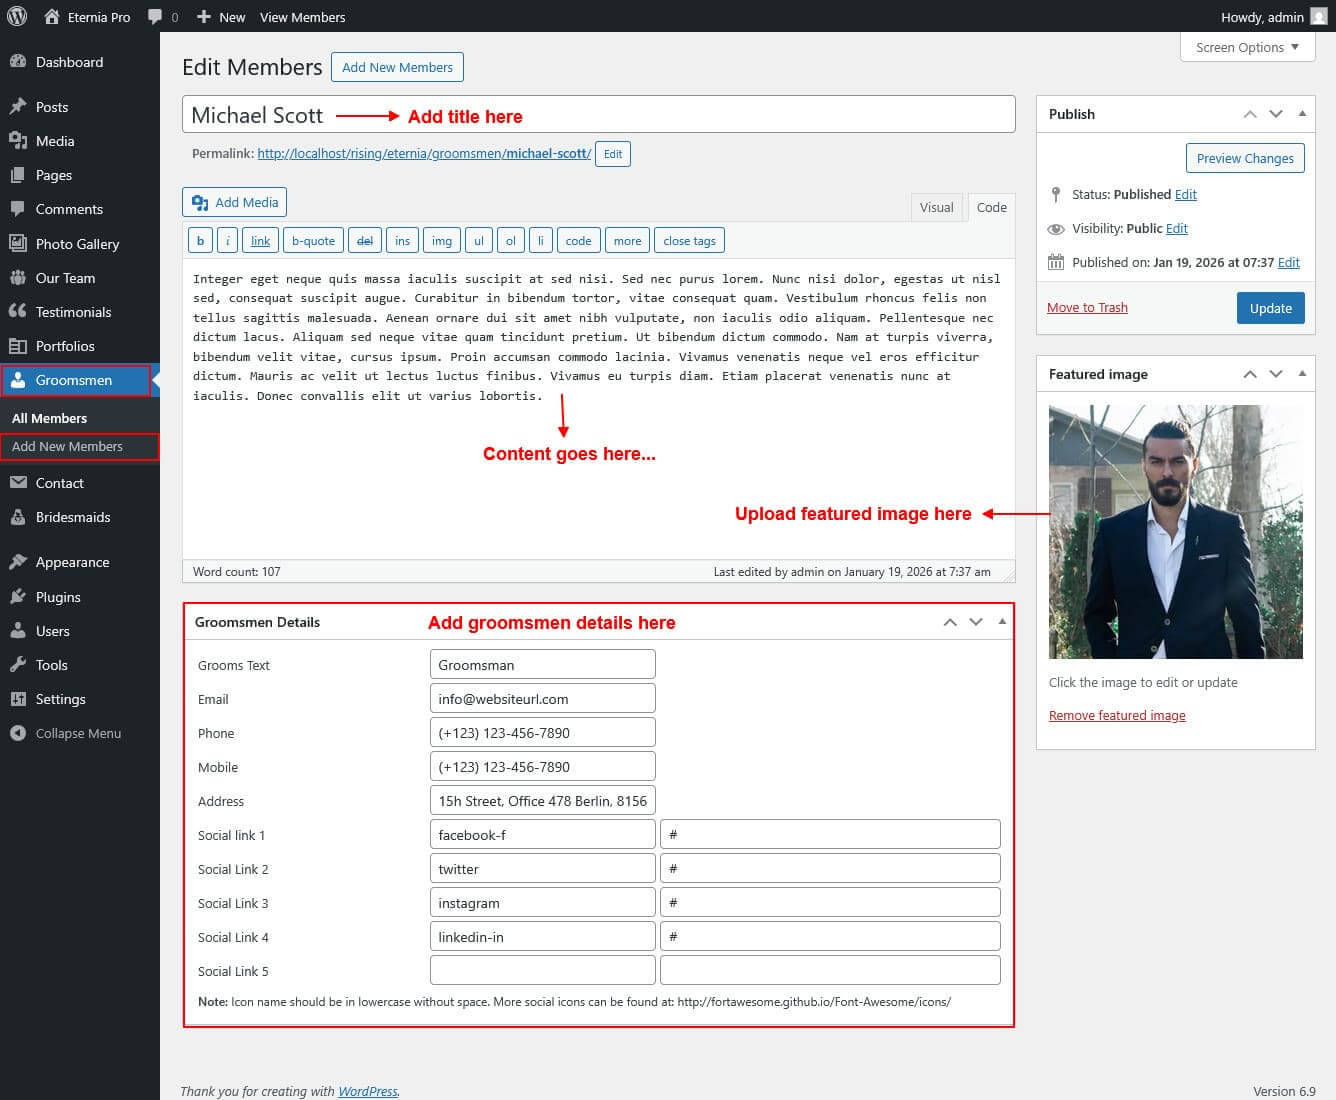
5. Groomsmen Section
This section is used to display Our Groomsmen in your website
- First of all create new posts from Groomsmen -> Add Groomsmen Members
- To manage this groomsmen section go to Appearance » Theme Options » Sections » Section 5
- Use this shortcode to display Groomsmen type Grid : [groomsmen type="grid" column="2/3/4" show="no. of item to be shown( Note: -1 for displaying all items )"]
- Use this shortcode to display Groomsmen type Slider : [groomsmen type="slider" show="no. of item to be shown( Note: -1 for displaying all items )"]
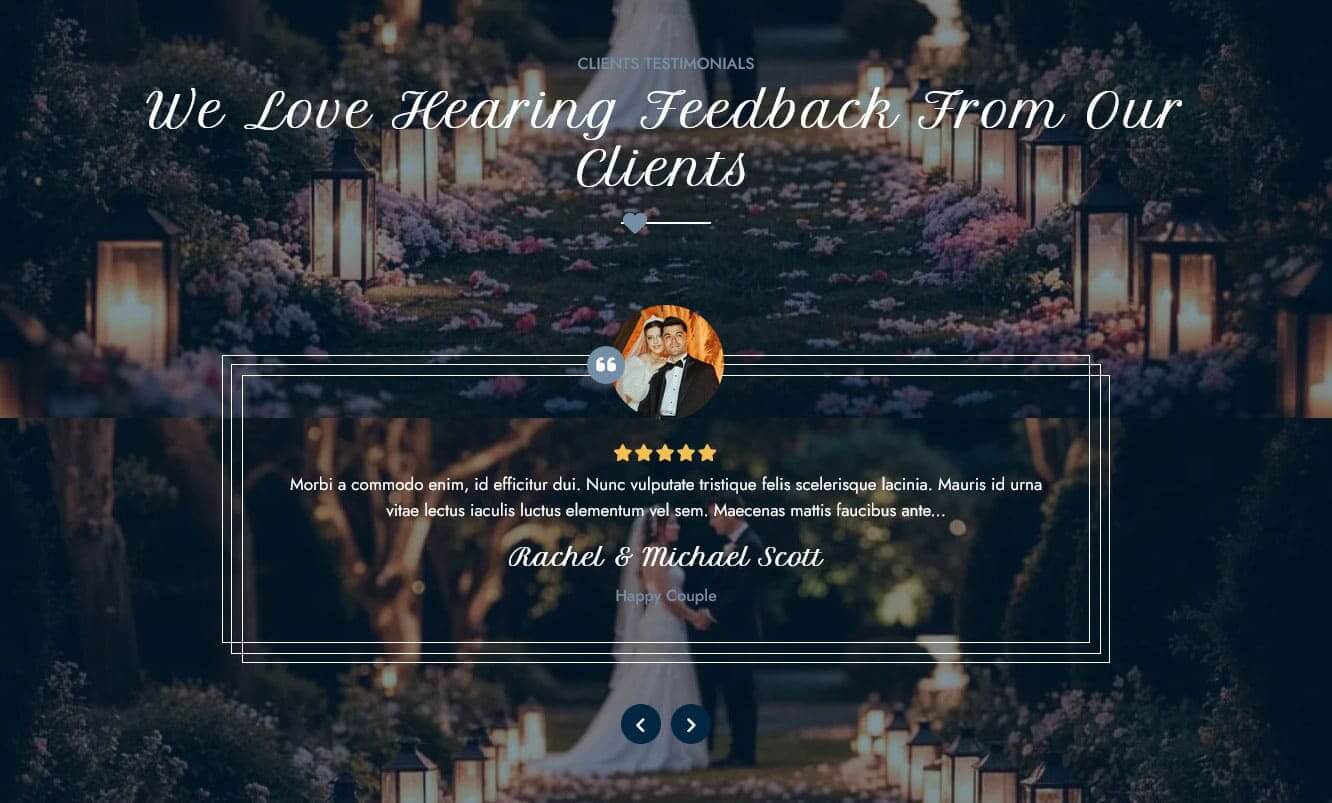
6. Client Testimonials
This section is used to display Client Testimonials in your website
- First of all create new posts from Testimonials -> Add Testimonials
- To manage this testimonials section go to Appearance » Theme Options » Sections » Section 6
- Use this shortcode to display Testimonials: [testimonials show="no. of item to be shown( Note: -1 for displaying all items )"]
- Use this shortcode to display Testimonials Listing: [testimonials-listing show="no. of item to be shown( Note: -1 for displaying all items )"]
- Use this shortcode to display Testimonials Sidebar Rotator: [sidebar-testimonials show="no. of item to be shown( Note: -1 for displaying all items )"]

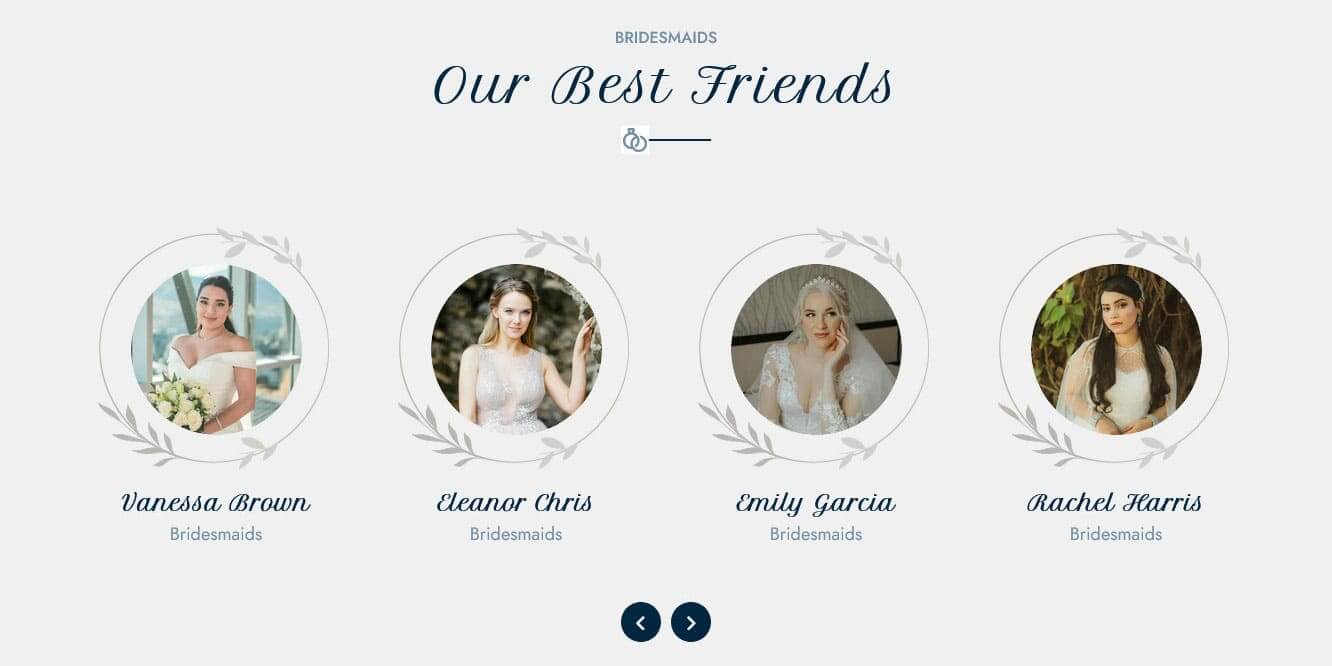
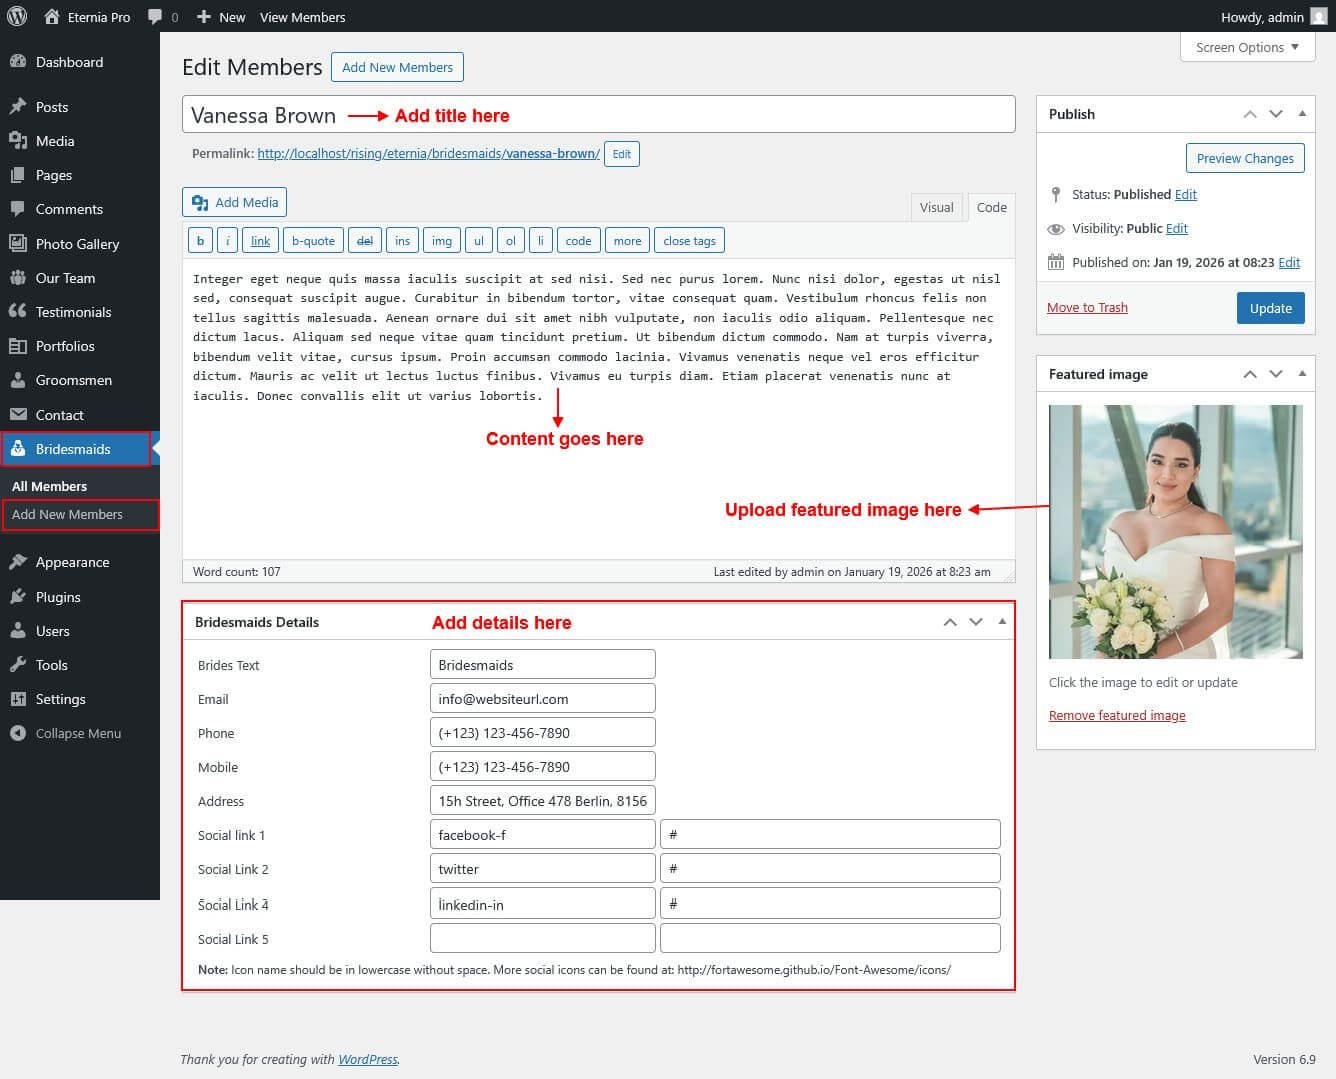
7. Bridesmaids Section
This section is used to display Our Bridesmaids in your website
- First of all create new posts from Bridesmaids -> Add Bridesmaids Members
- To manage this bridesmaids section go to Appearance » Theme Options » Sections » Section 7
- Use this shortcode to display Bridesmaids type Grid : [bridesmaids type="grid" column="2/3/4" show="no. of item to be shown( Note: -1 for displaying all items )"]
- Use this shortcode to display Bridesmaids type Slider : [bridesmaids type="slider" show="no. of item to be shown( Note: -1 for displaying all items )"]
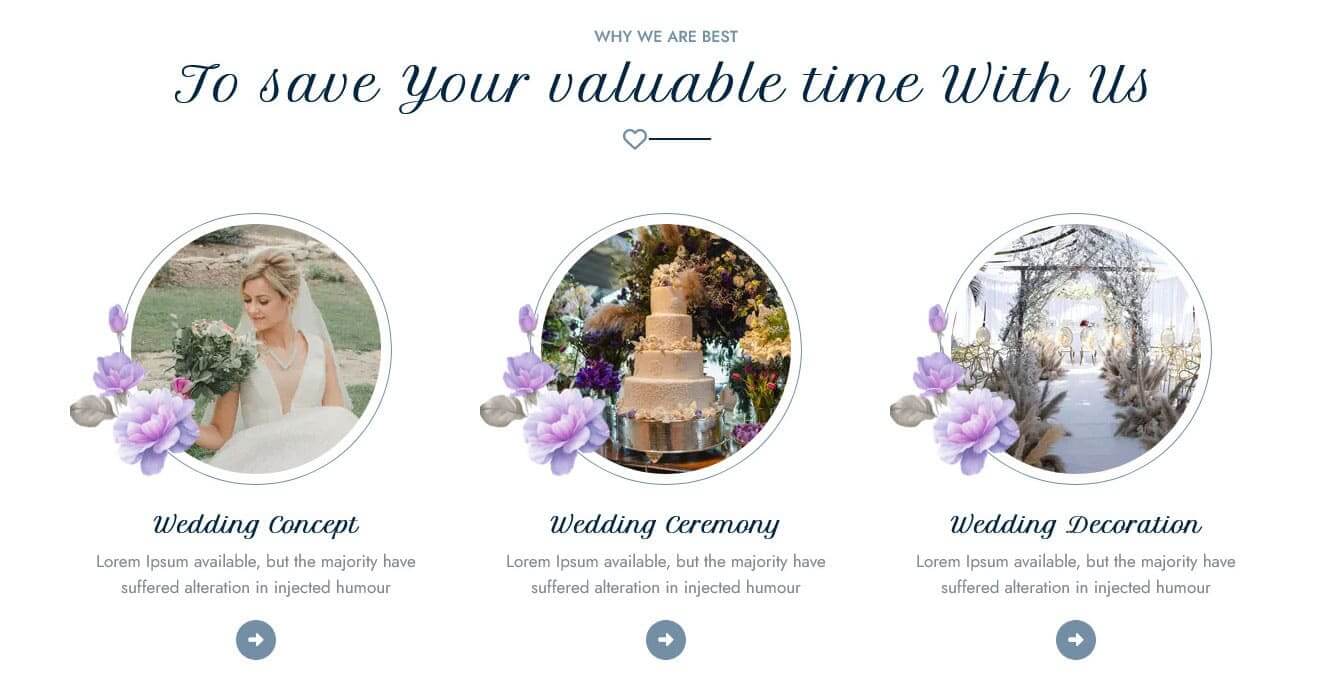
8. Why We Are Best Section
- To manage this section go to Appearance » Theme Options » Sections » Section 8
- Use this shortcode to display Why We Are Best section :
- [row][column col="4"][feature_box image_path="Add image path here" title="Add title here" desc="Add small description here" link="Add link here"][/column][column col="4"][feature_box image_path="Add image path here" title="Add title here" desc="Add small description here" link="Add link here"][/column][column col="4"][feature_box image_path="Add image path here" title="Add title here" desc="Add small description here" link="Add link here"][/column][/row]
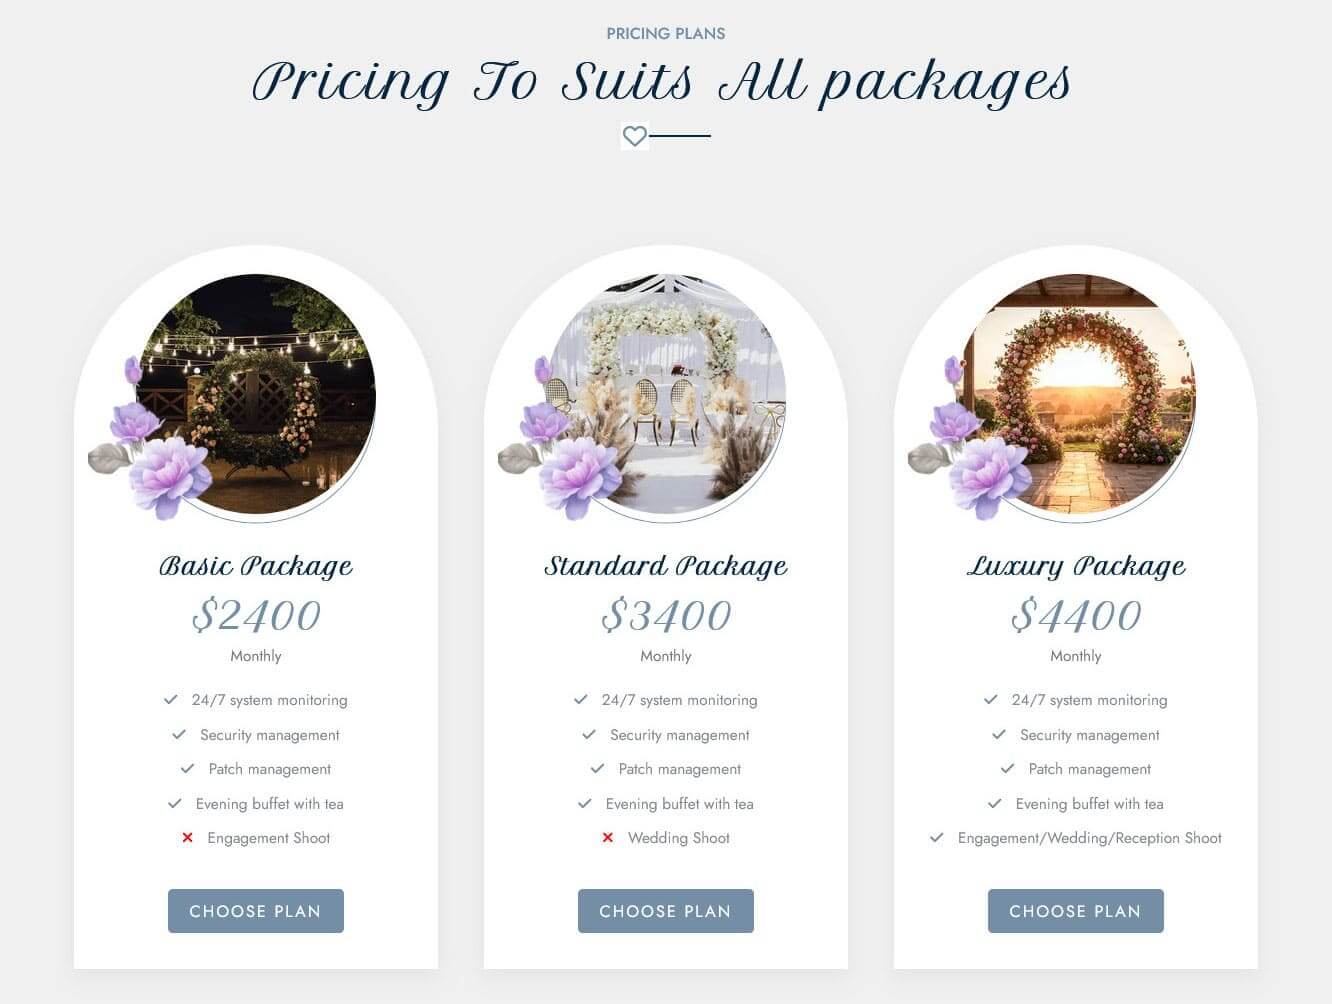
9. Pricing Plans Section
- To manage this section go to Appearance » Theme Options » Sections » Section 9
- Use this shortcode to display Pricing Plans section :
- [row][column col="4"][pricing_plan image_path="Add image path here" title="Add title here" duration="Add duration here ex. (Monthly)" price="Add price here ex. ($2400)" button_text="Add button text here" button_link="Add button link here" point1="Add text here" point1_icon="Add check or time here ex. (check/times)" point2="Add text here" point2_icon="Add check or time here ex. (check/times)" point3="Add text here" point3_icon="Add check or time here ex. (check/times)" point4="Add text here" point4_icon="Add check or time here ex. (check/times)" point5="Add text here" point5_icon="Add check or time here ex. (check/times)" point6="Add text here" point6_icon="Add check or time here ex. (check/times)" point7="Add text here" point7_icon="Add check or time here ex. (check/times)" point8="Add text here" point8_icon="Add check or time here ex. (check/times)" point9="Add text here" point9_icon="Add check or time here ex. (check/times)" point10="Add text here" point10_icon="Add check or time here ex. (check/times)" button_text="Add button text here" button_link="Add button link here"][/column][column col="4"][pricing_plan image_path="Add image path here" title="Add title here" duration="Add duration here ex. (Monthly)" price="Add price here ex. ($2400)" button_text="Add button text here" button_link="Add button link here" point1="Add text here" point1_icon="Add check or time here ex. (check/times)" point2="Add text here" point2_icon="Add check or time here ex. (check/times)" point3="Add text here" point3_icon="Add check or time here ex. (check/times)" point4="Add text here" point4_icon="Add check or time here ex. (check/times)" point5="Add text here" point5_icon="Add check or time here ex. (check/times)" point6="Add text here" point6_icon="Add check or time here ex. (check/times)" point7="Add text here" point7_icon="Add check or time here ex. (check/times)" point8="Add text here" point8_icon="Add check or time here ex. (check/times)" point9="Add text here" point9_icon="Add check or time here ex. (check/times)" point10="Add text here" point10_icon="Add check or time here ex. (check/times)" button_text="Add button text here" button_link="Add button link here"][/column][column col="4"][pricing_plan image_path="Add image path here" title="Add title here" duration="Add duration here ex. (Monthly)" price="Add price here ex. ($2400)" button_text="Add button text here" button_link="Add button link here" point1="Add text here" point1_icon="Add check or time here ex. (check/times)" point2="Add text here" point2_icon="Add check or time here ex. (check/times)" point3="Add text here" point3_icon="Add check or time here ex. (check/times)" point4="Add text here" point4_icon="Add check or time here ex. (check/times)" point5="Add text here" point5_icon="Add check or time here ex. (check/times)" point6="Add text here" point6_icon="Add check or time here ex. (check/times)" point7="Add text here" point7_icon="Add check or time here ex. (check/times)" point8="Add text here" point8_icon="Add check or time here ex. (check/times)" point9="Add text here" point9_icon="Add check or time here ex. (check/times)" point10="Add text here" point10_icon="Add check or time here ex. (check/times)" button_text="Add button text here" button_link="Add button link here"][/column][/row]
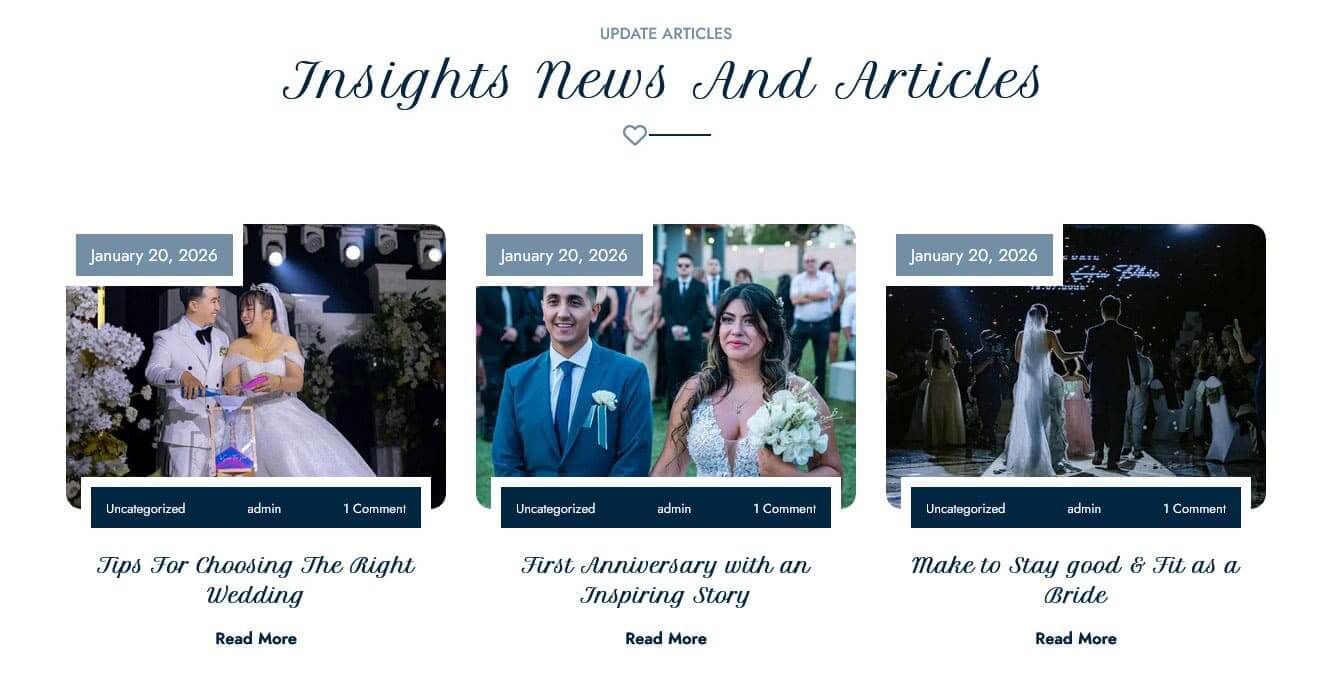
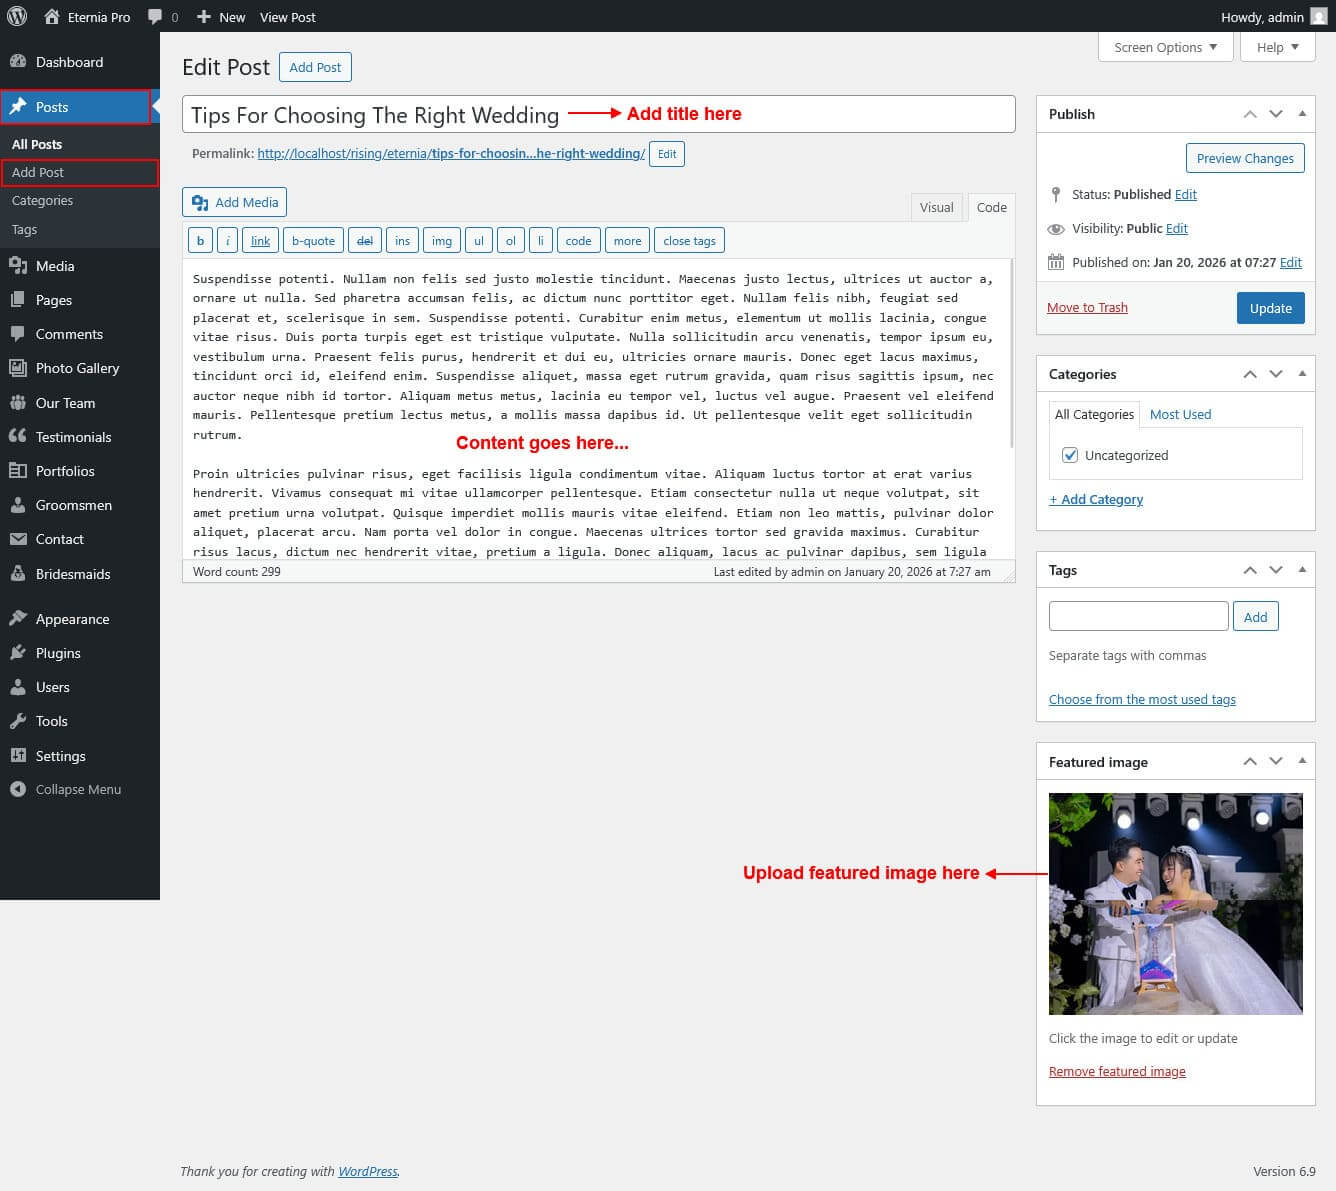
10. Update Articles Section
This section is used to display Update Articles Posts in your website
- First of all create new posts from Posts -> Add Posts
- To manage this section go to Appearance » Theme Options » Sections » Section 10
- Use this shortcode to display Update Articles Posts type Grid: [latest-news show="3" type="grid" column="2/3/4" date="show/hide" comment="show/hide" author="show/hide" category="show/hide"]
- Use this shortcode to display Update Articles Posts type Slider: [latest-news show="-1" type="slider" comment="show" date="show" author="show" category="show"]
Footer
The Footer section consists of four main elements:
- Newsletter
- Contact Us
- Our Address
- Follow Us
- Copyright & Design by text
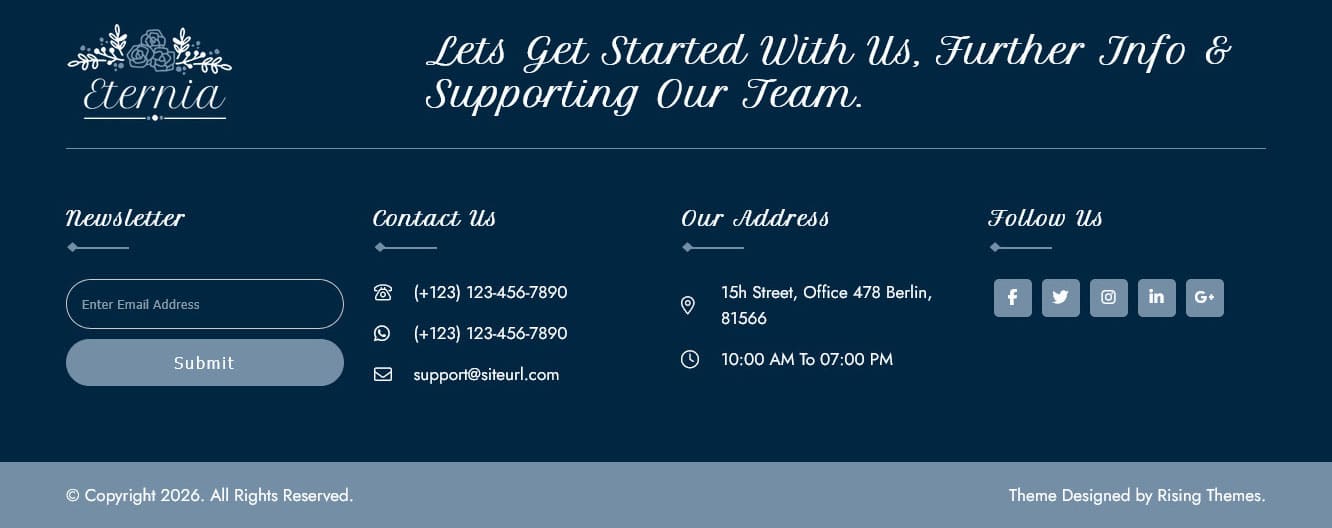
To manage footer section go to the Appearance » Theme Options » Footer
Page Templates & Sidebars
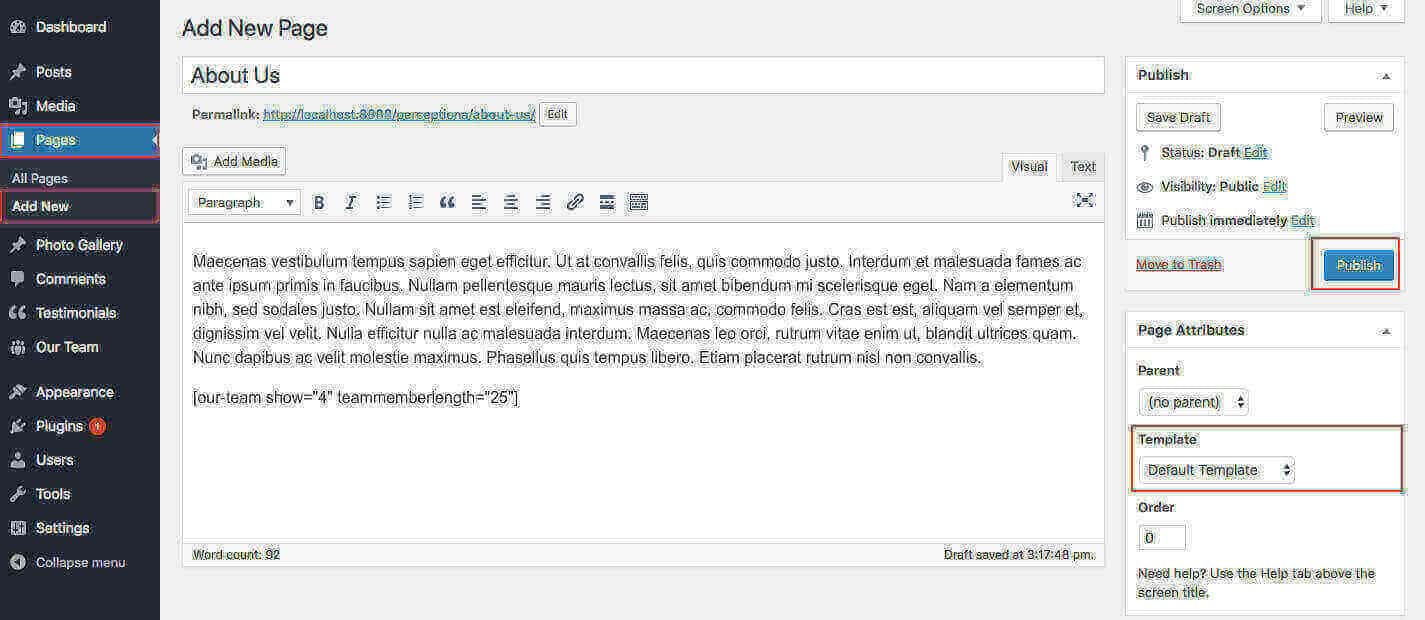
When you create a new page from the Pages » Add New section, the "Default Template" is assigned to the page by default. The default page template is a standard page template that can be with a sidebar or full-width layout and can contain custom content.
- Default Template
- Used to setting up the content on any page with Right Sidebar
- Left Sidebar
- Used to setting up the content on any page with Left Sidebar
- Full Width
- Used to setting up the content on any page without Sidebar
- Full Screen
- Used to setting up the content on any page without Sidebar Full Screen
- No Sidebar
- Used to setting up the content in center on any page without Sidebar
- Contact Us
- Used to setting up the contact page.
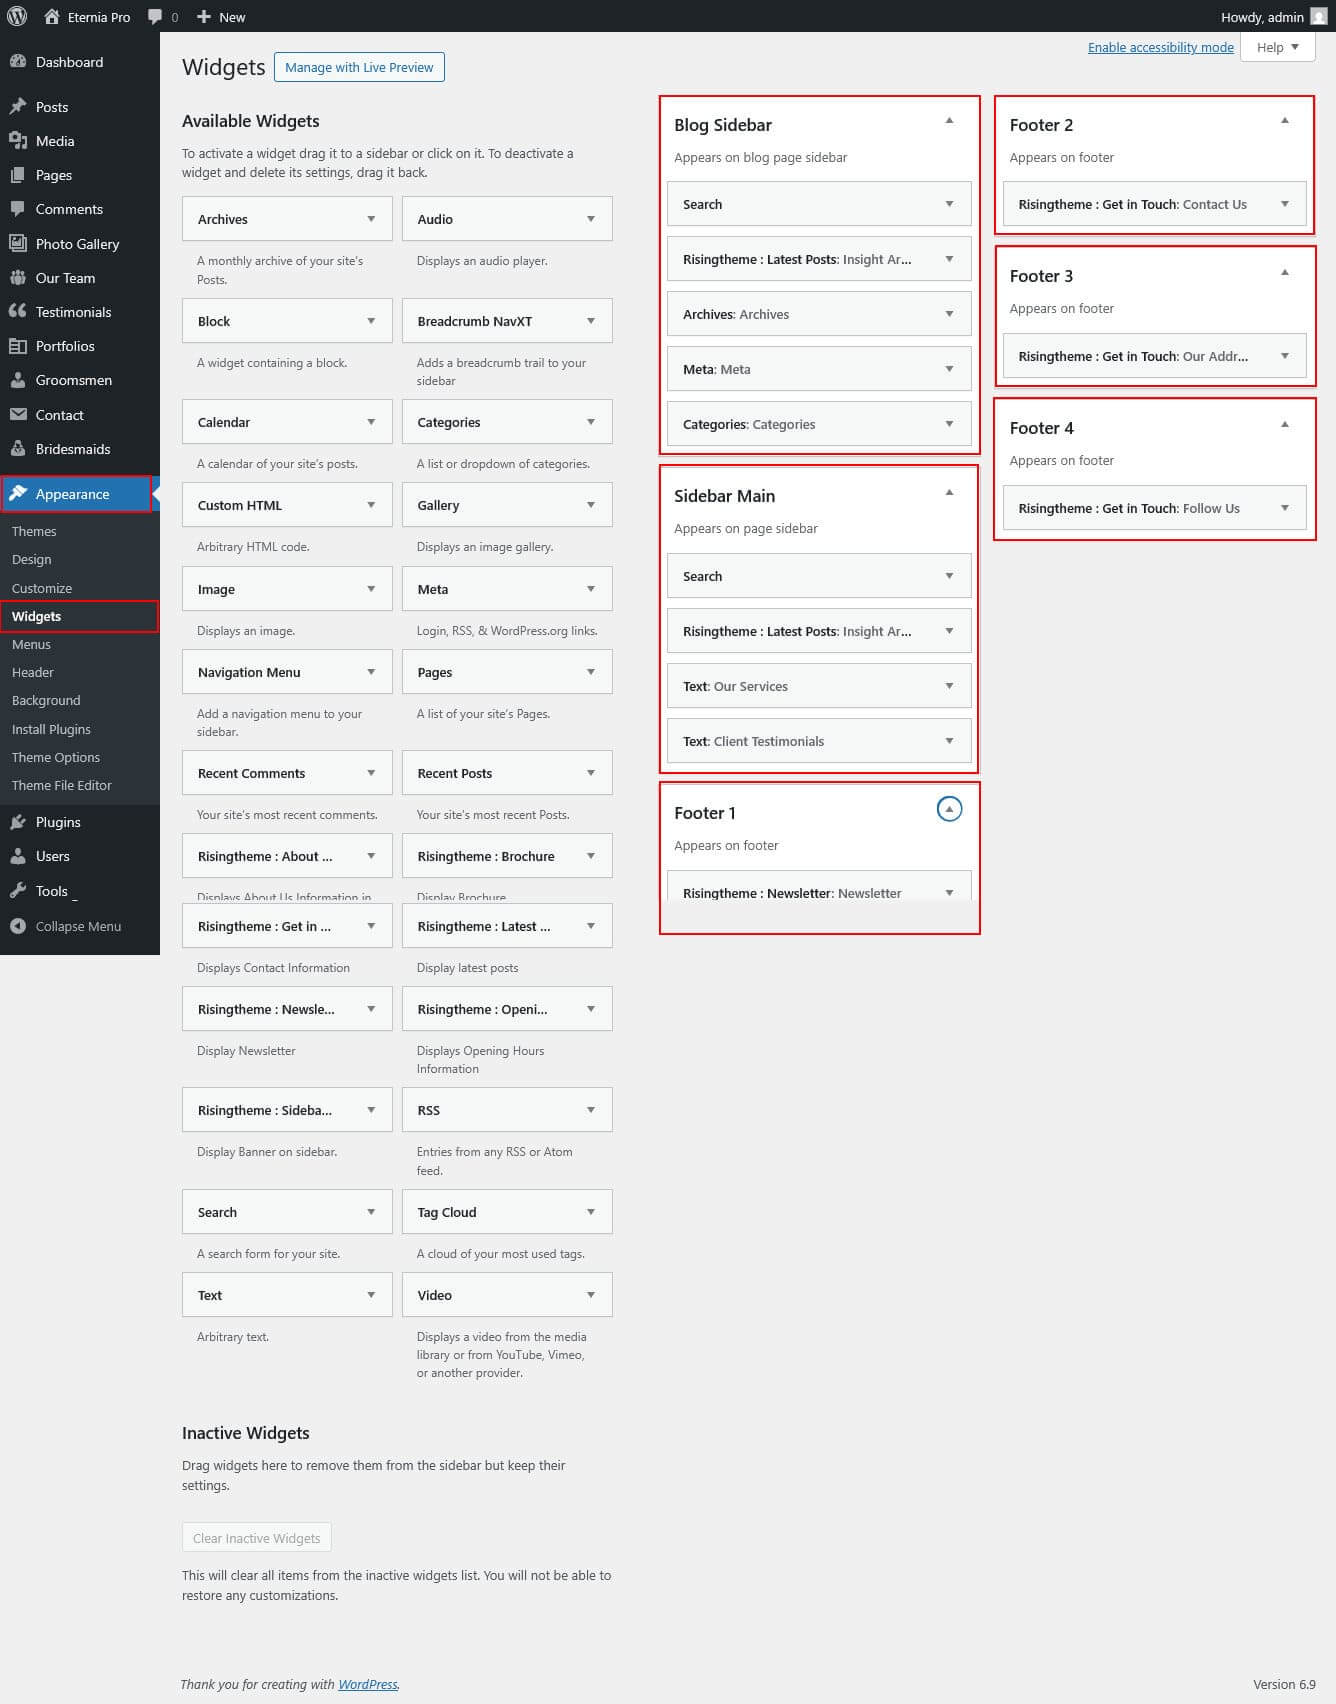
Widgets
The WordPress widgets are used to manage sidebars:
- Can manage sidebar from widgets (exa. blog sidebar, main sidebar and shop widget)
- Footer section can manage from footer widgets 1,2.3,4
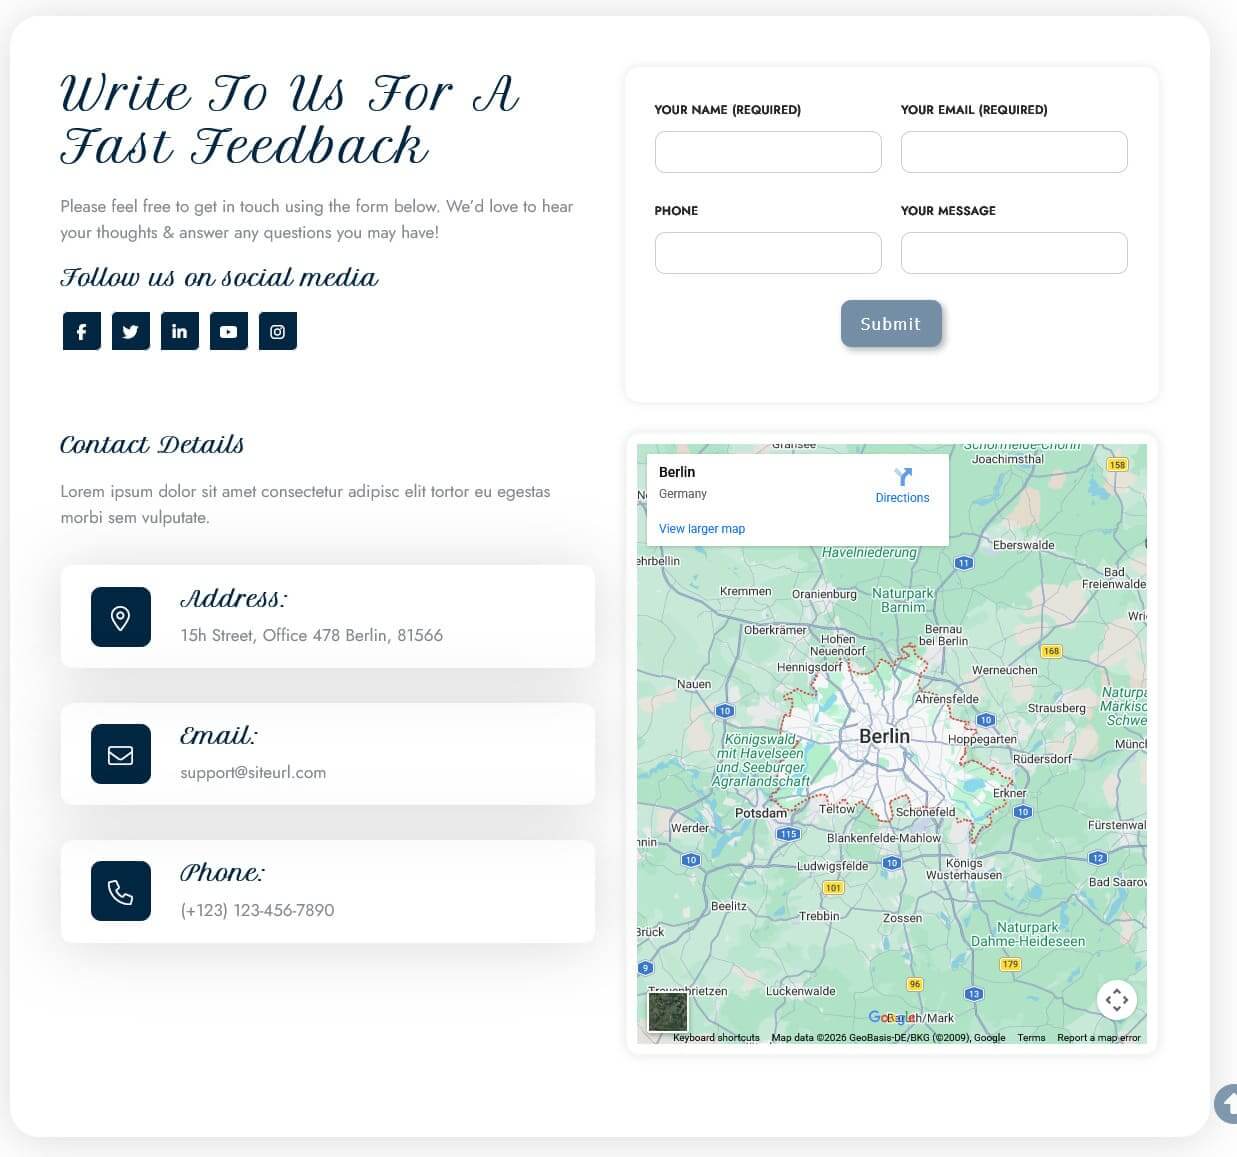
Contact Page
To view contact page shortcode go to Appearance » Theme Options » Basic Settings » Contact Page:
Shortcodes
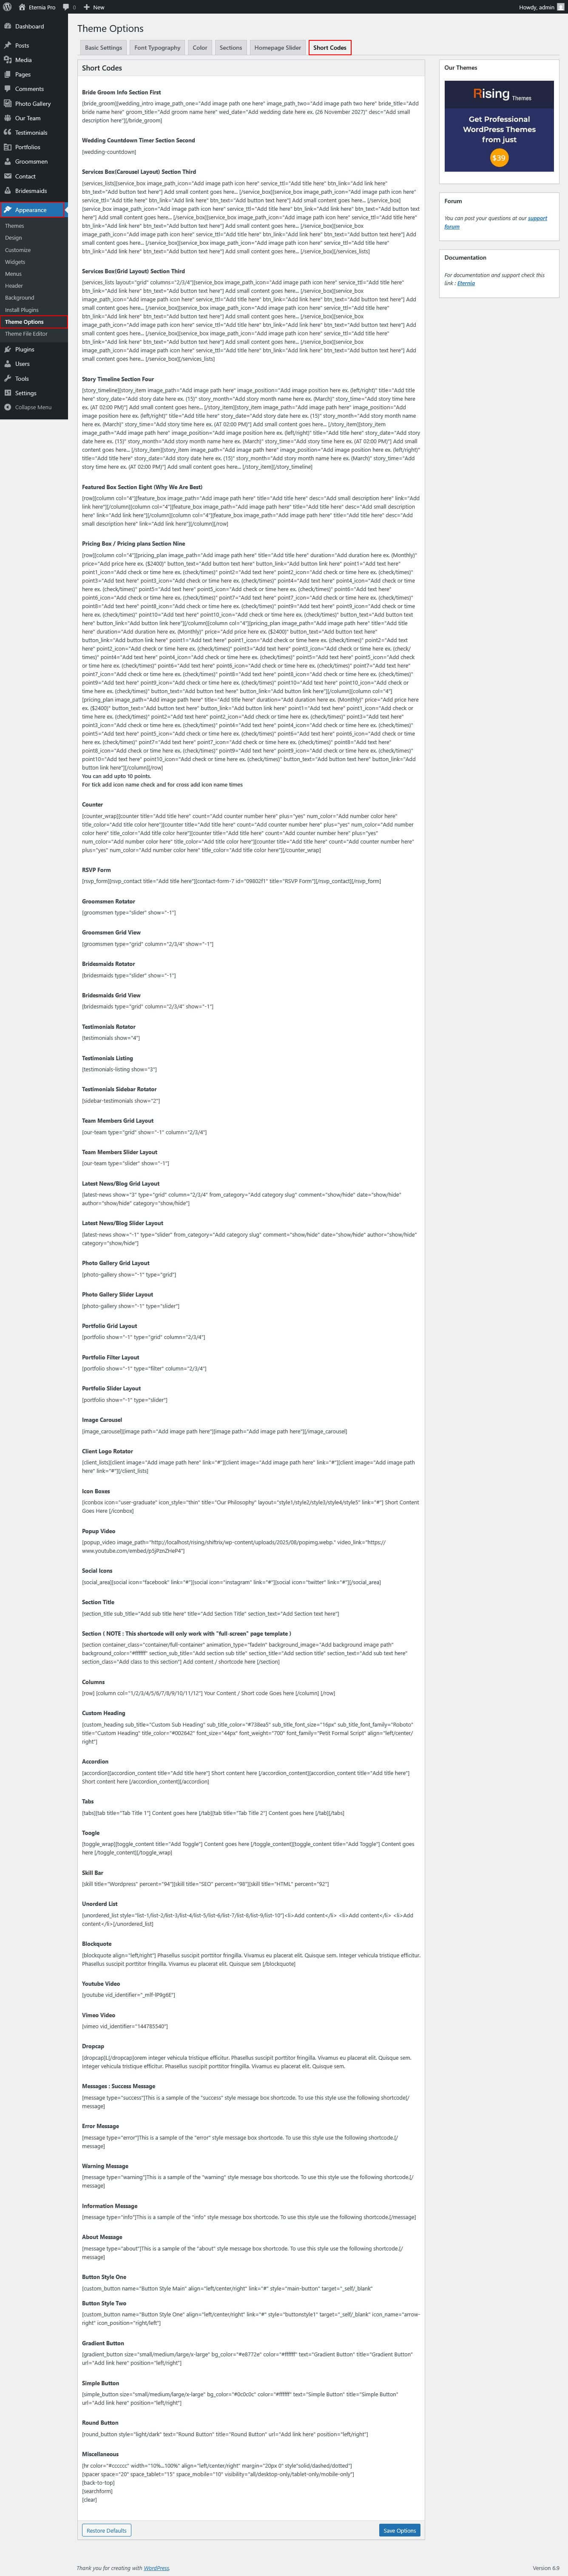
To view all shortcodes go to Appearance » Theme Options » Short Codes:
Basic Setting / Font Typography / Color
To view besic setting go to Appearance » Theme Options » Besic Setting :

Font Typography
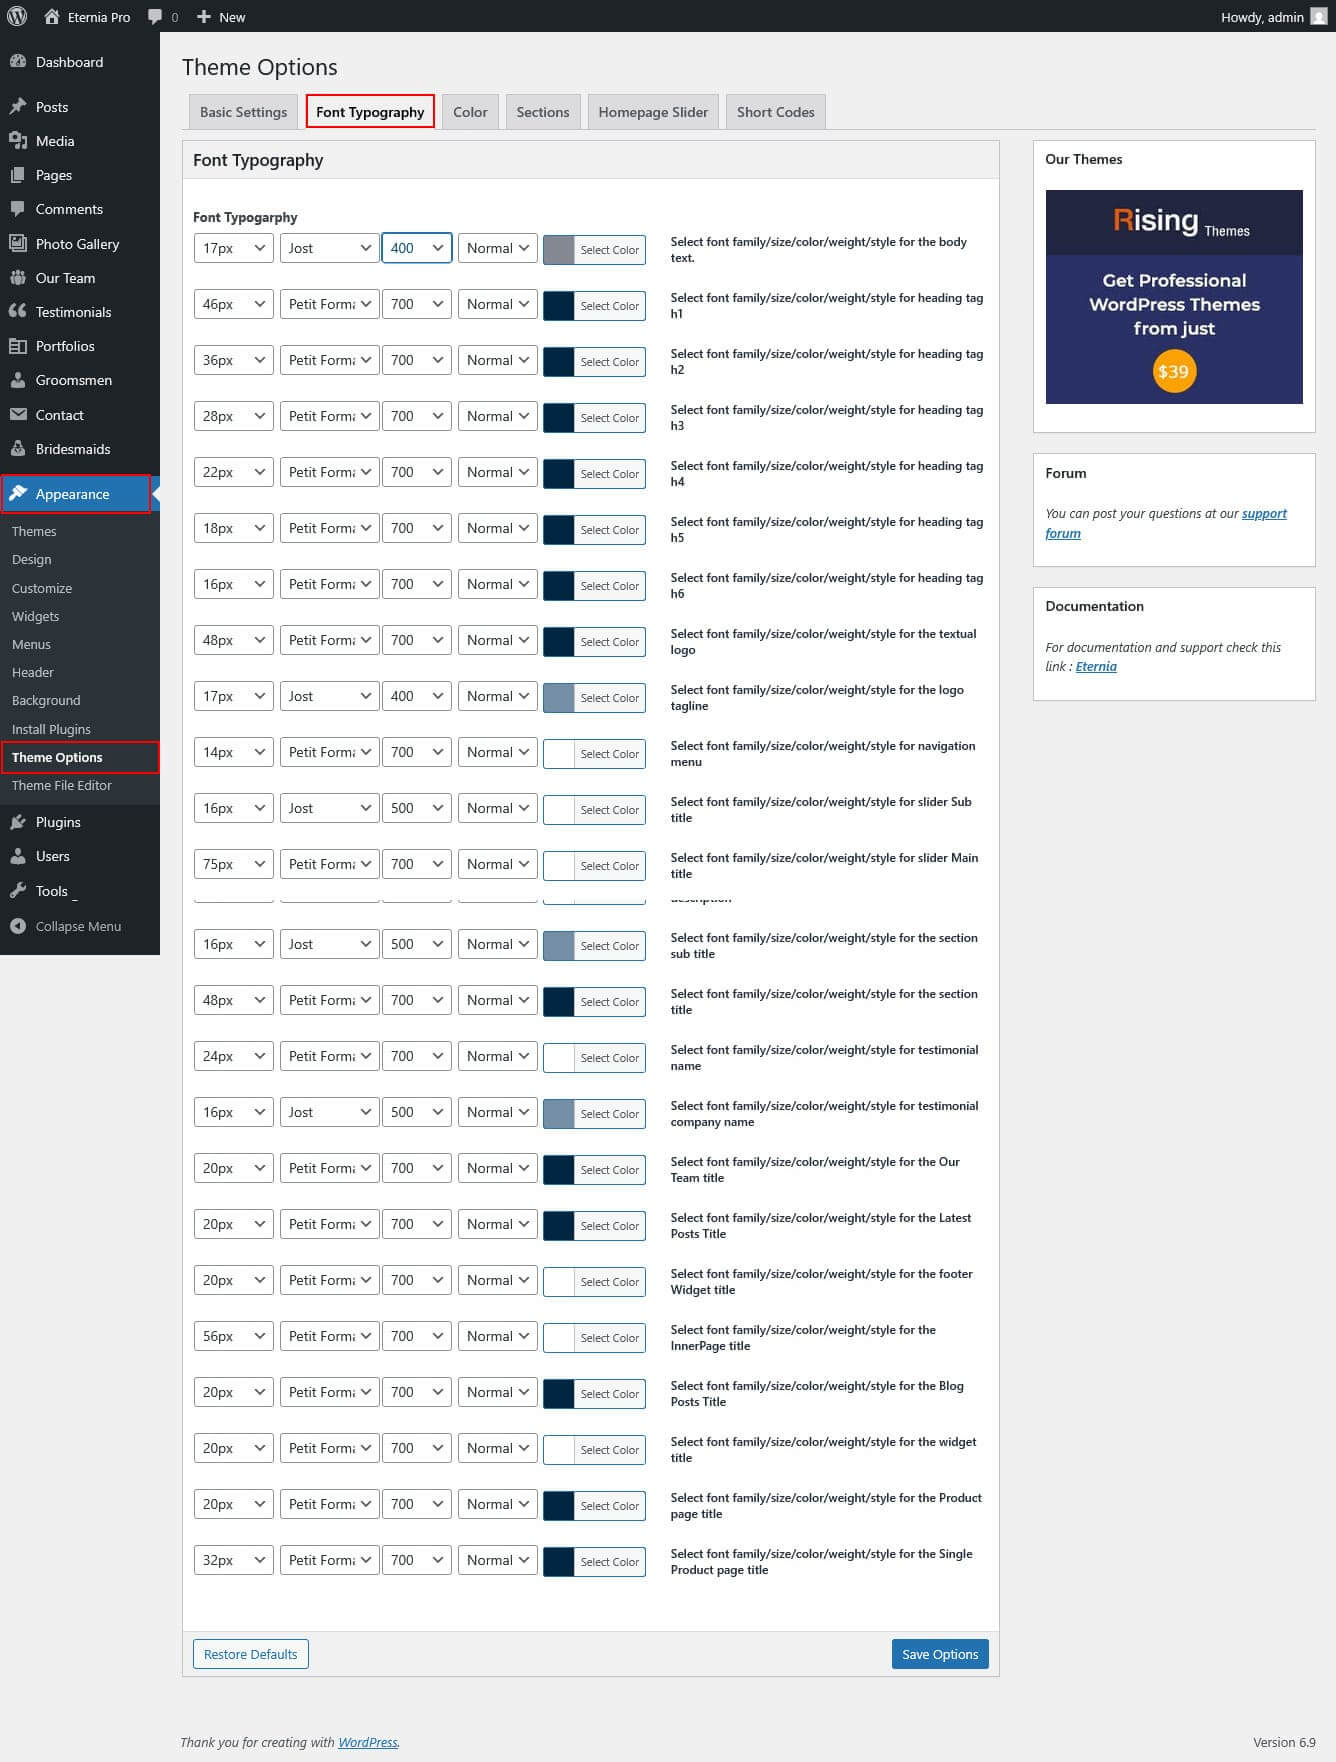
To view Font Typography go to Appearance » Theme Options » Font Typography :
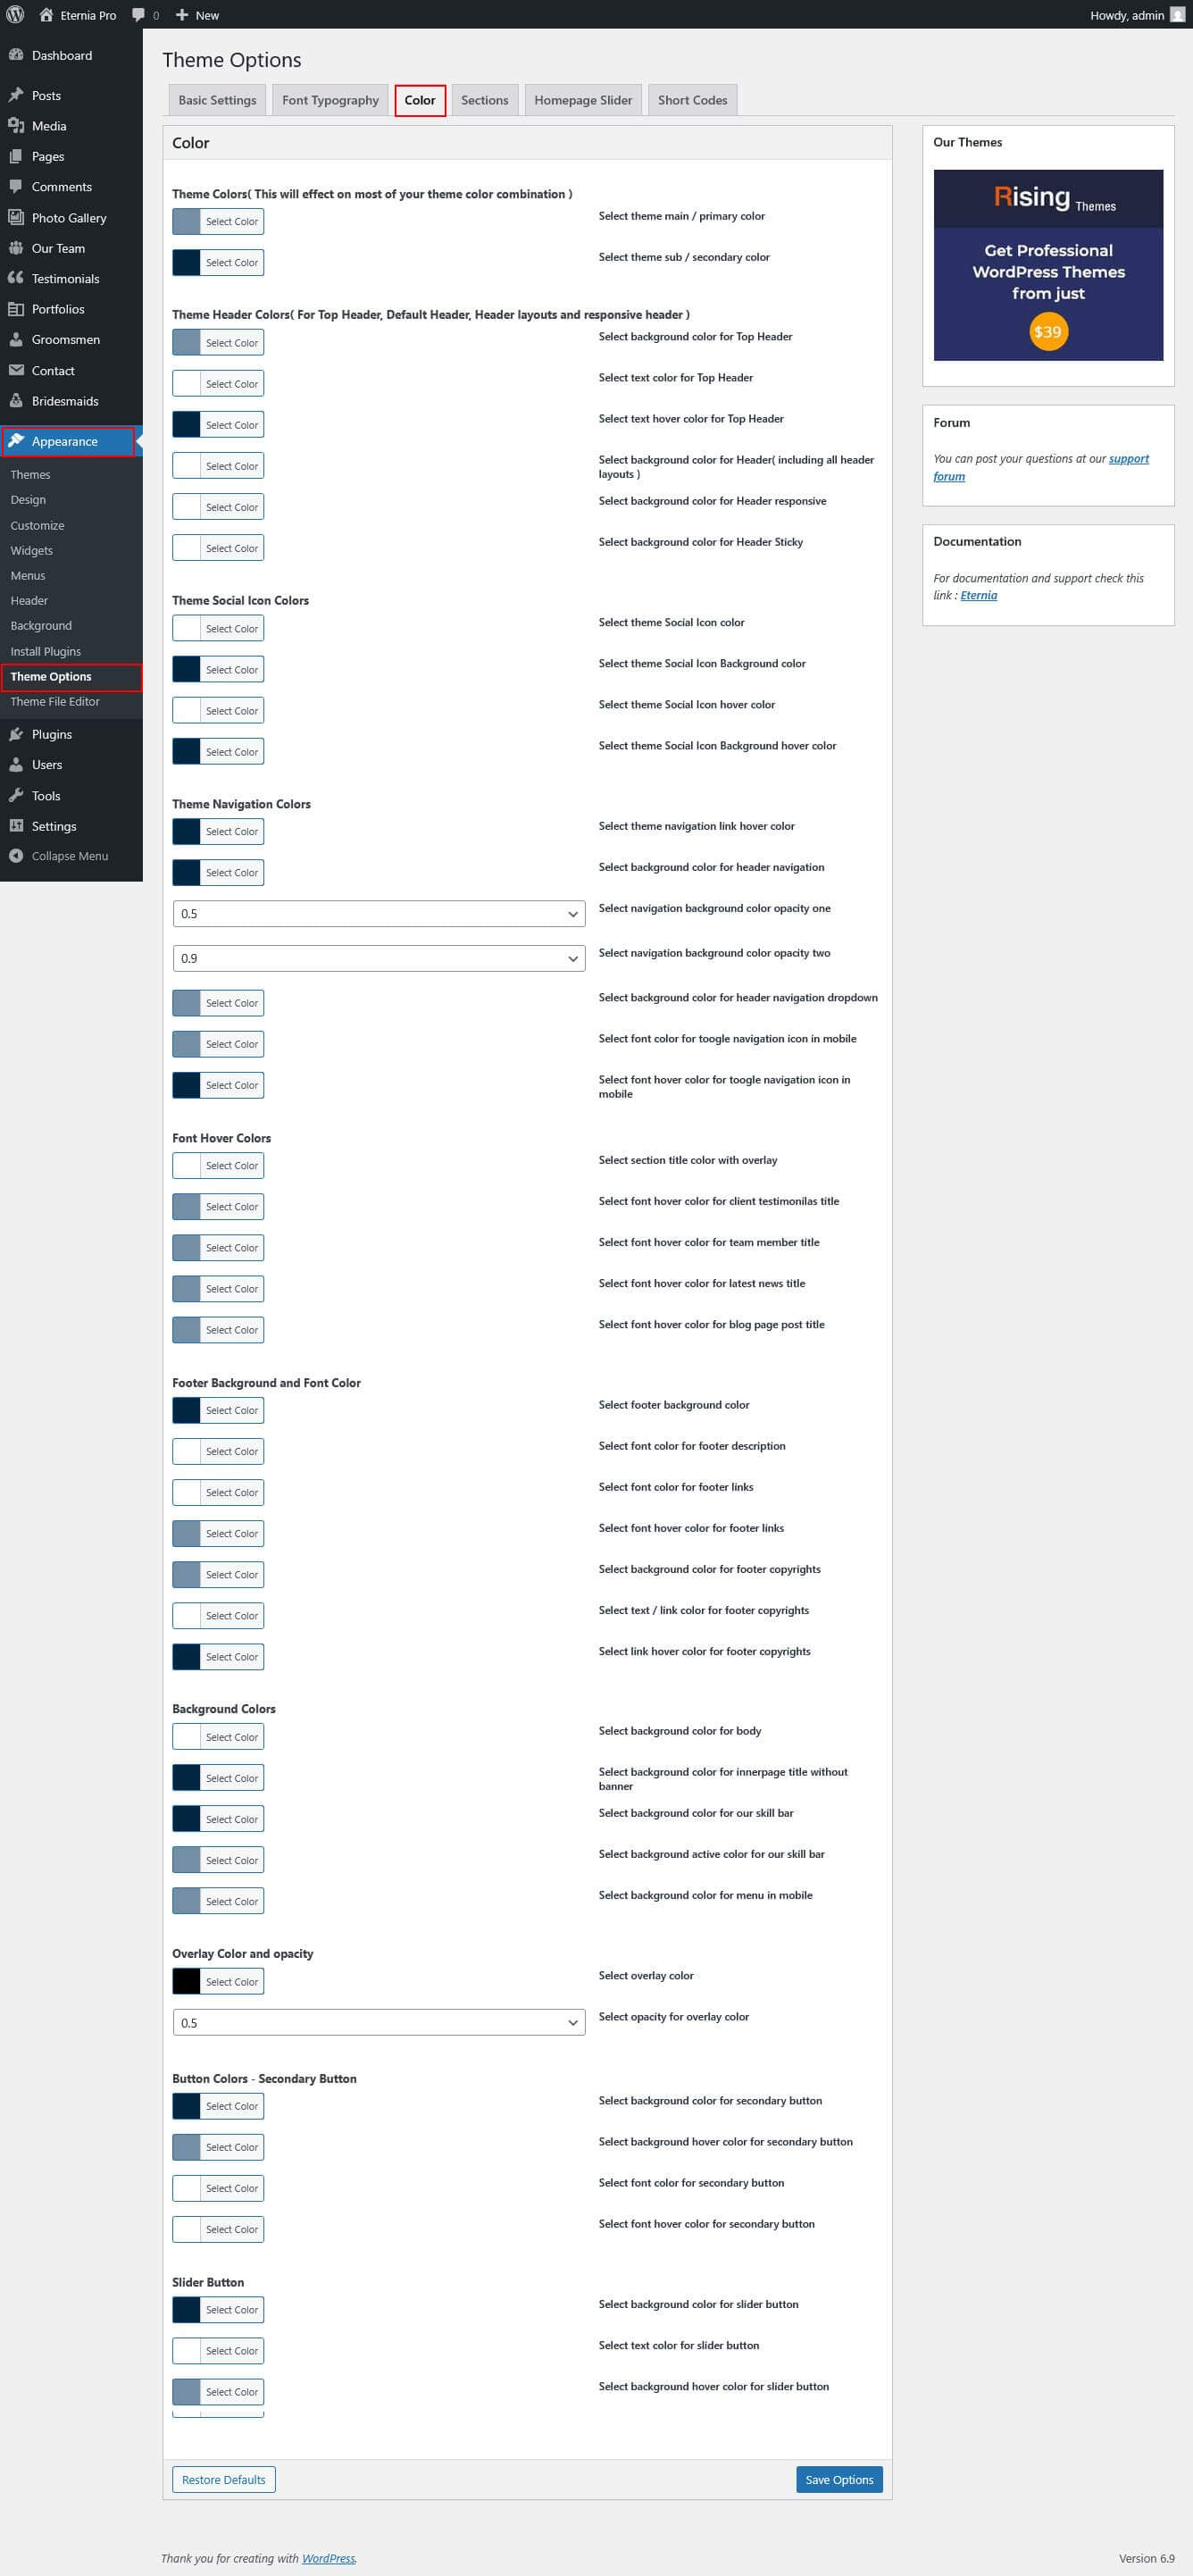
Color
To view Color go to Appearance » Theme Options » Color :
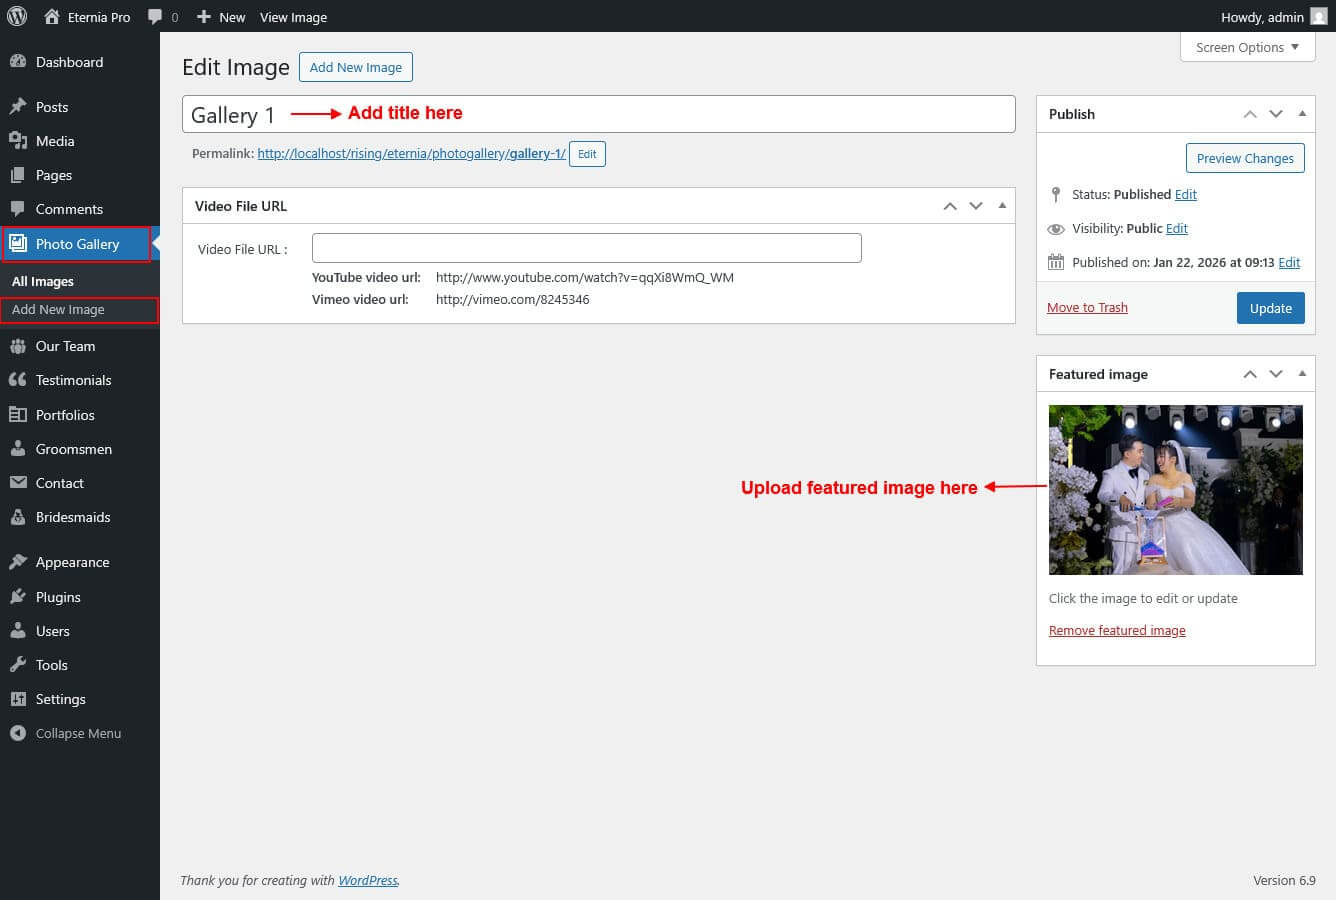
Gallery
To view Gallery Page:
- First of all create new posts from gallery -> Add New
- Use this shortcode to display Gallery type Grid Masonary : [photo-gallery show="no. of item to be shown( Note: -1 for displaying all items )" type="grid"]
- Use this shortcode to display Gallery type Slider : [photo-gallery show="no. of item to be shown( Note: -1 for displaying all items )" type="slider"]

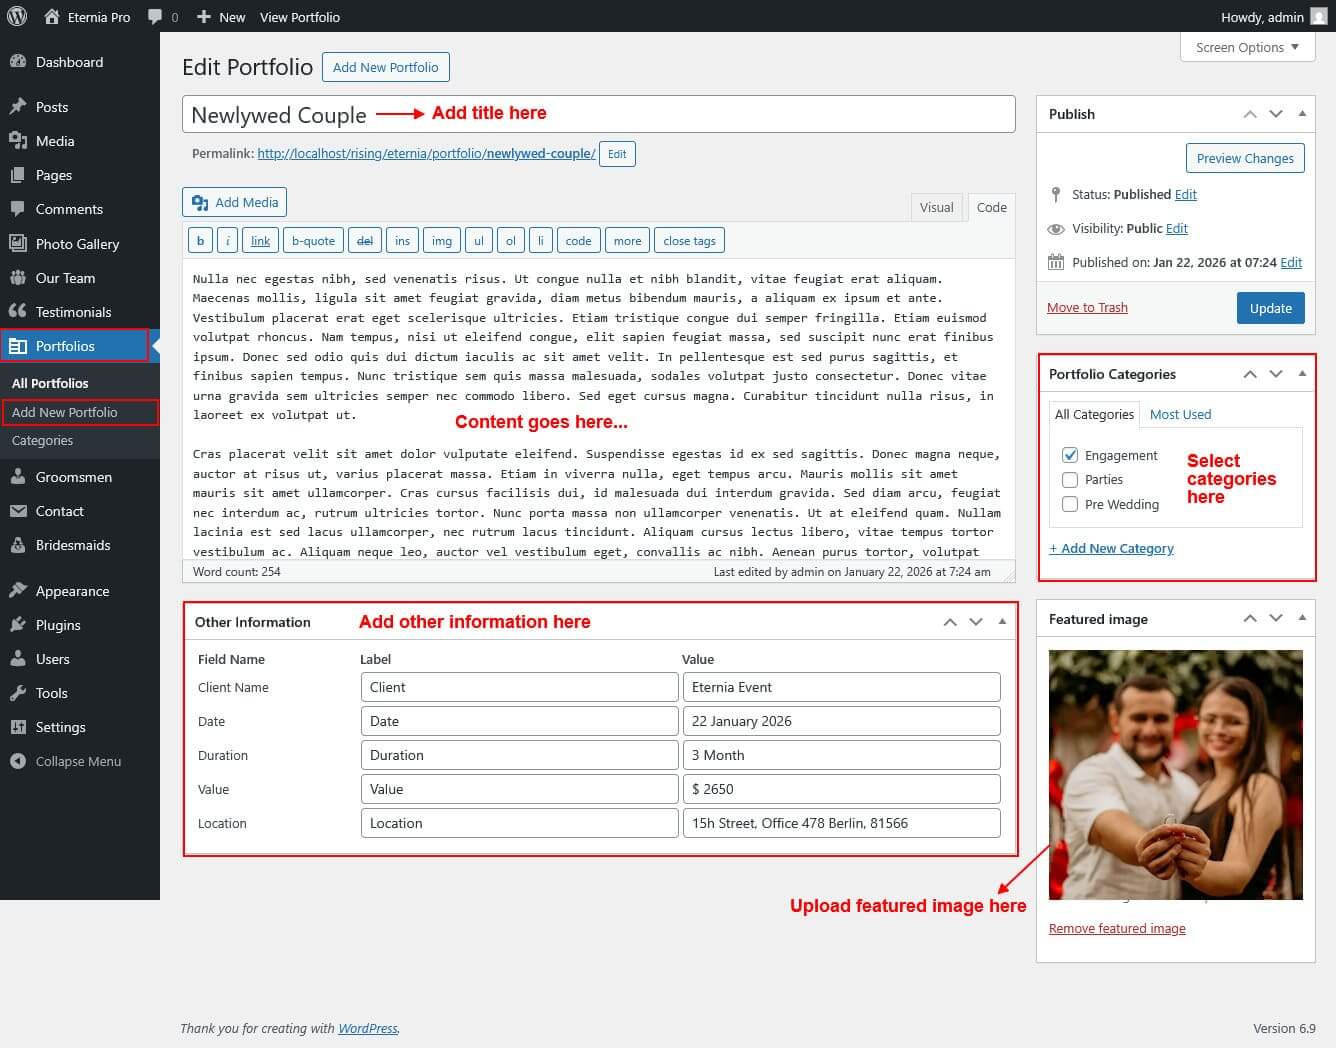
Portfolio
To view Portfolio Page:
- First of all create new posts from portfolio -> Add New
- Use this shortcode to display Portfolio type Grid : [portfolio show="no. of item to be shown( Note: -1 for displaying all items )" type="grid" column="2/3/4"]
- Use this shortcode to display Portfolio type Filter : [portfolio show="no. of item to be shown( Note: -1 for displaying all items )" type="filter" column="2/3/4"]
- Use this shortcode to display Portfolio type Slider : [portfolio show="no. of item to be shown( Note: -1 for displaying all items )" type="slider"]